Various lamps
Here we have a collection of LED lamps that I've put together over the years. I didn't see the point in creating a separate page for each one as they are all essentially the same thing. LEDs, a thermal path to keep them cool, and a LED driver.
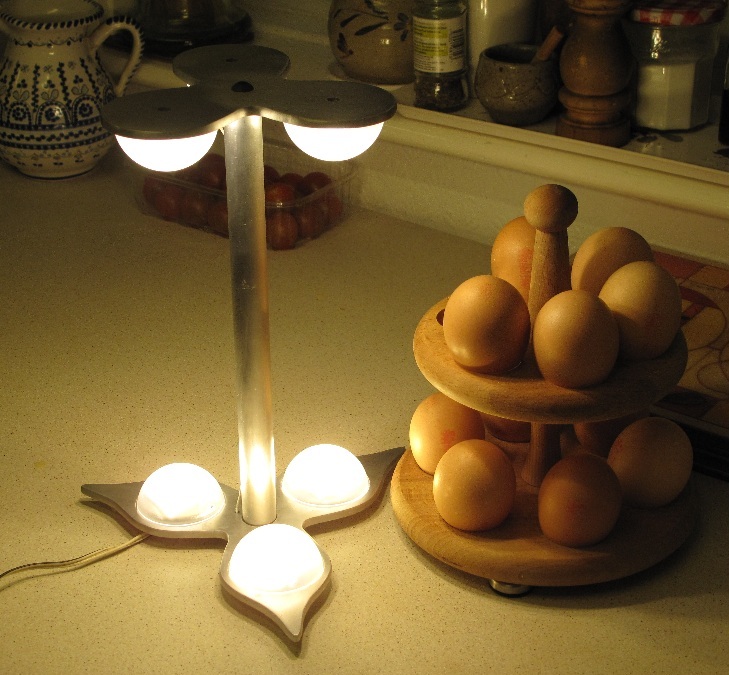
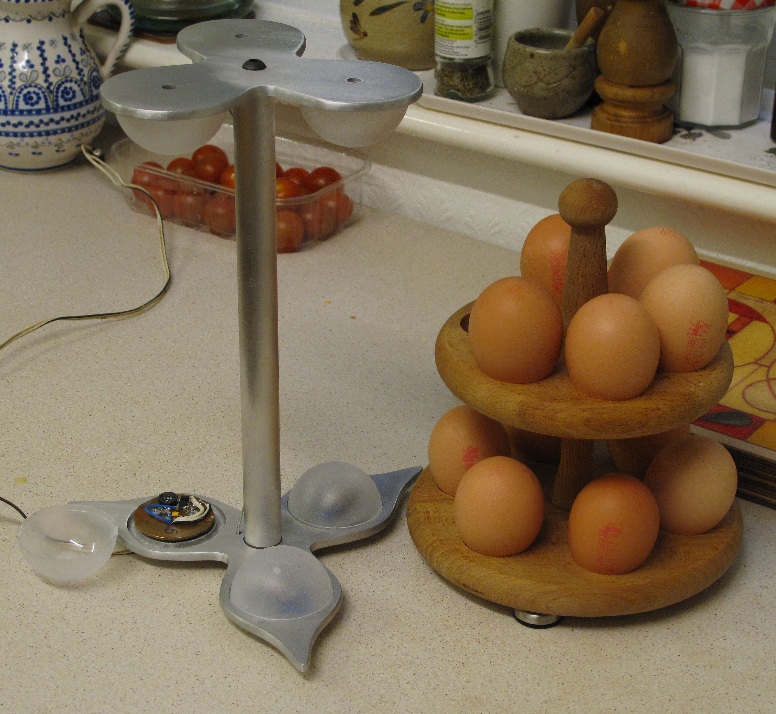
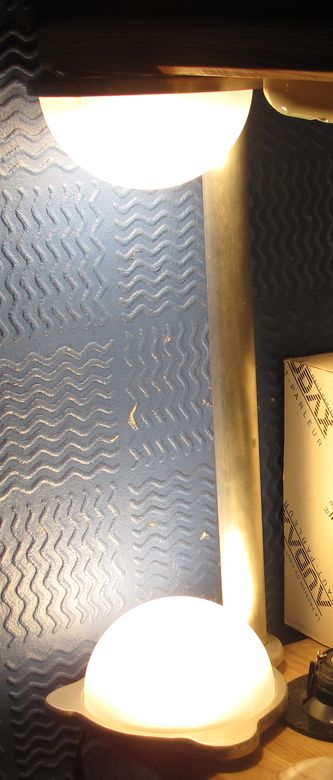
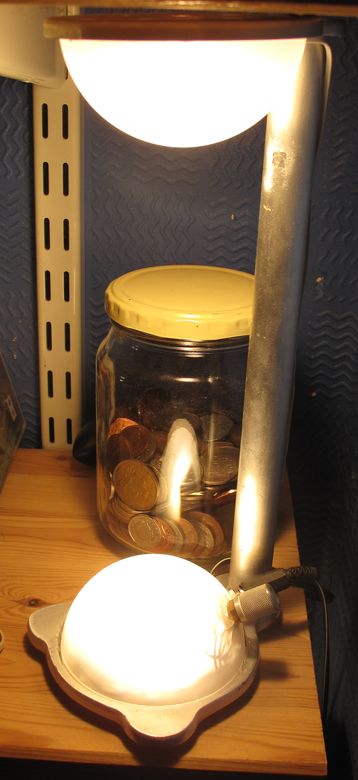
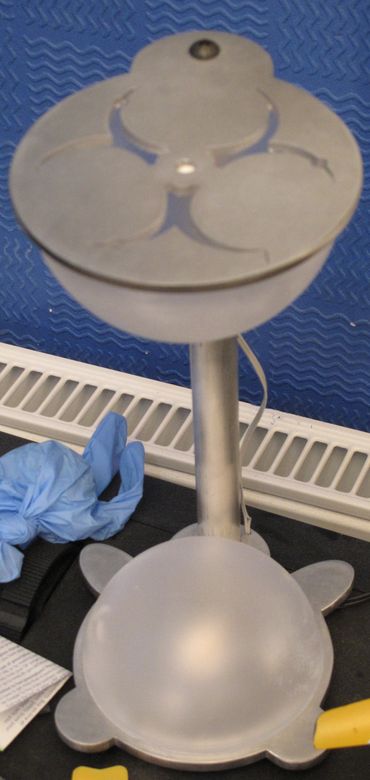
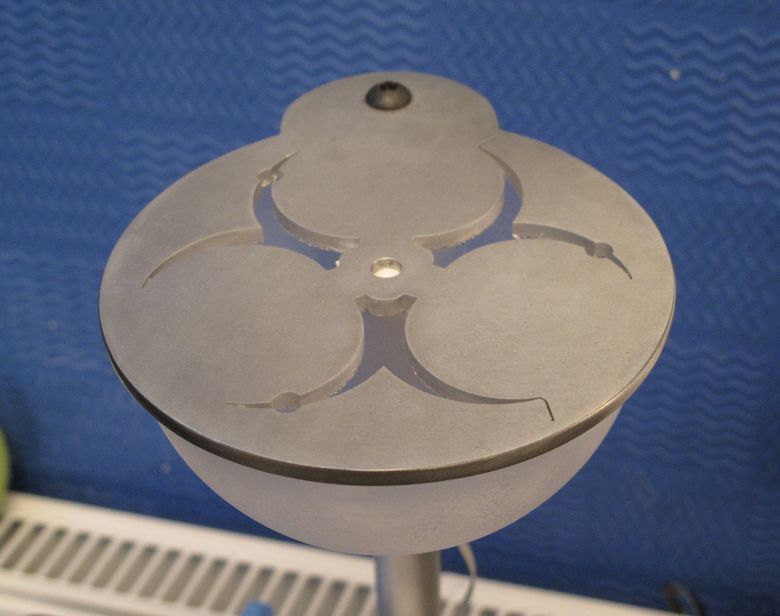
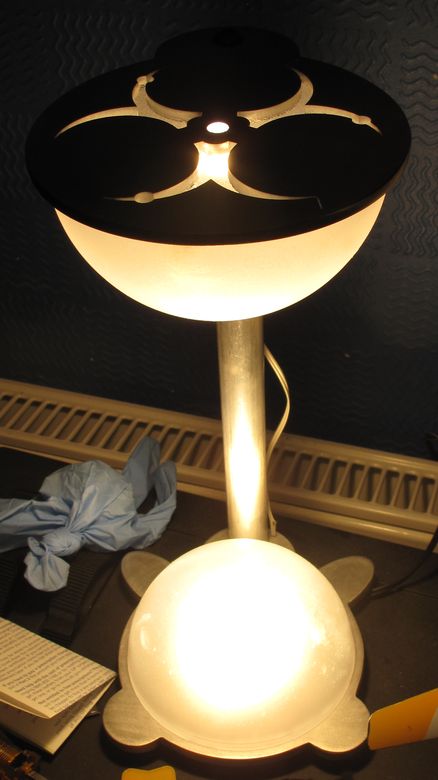
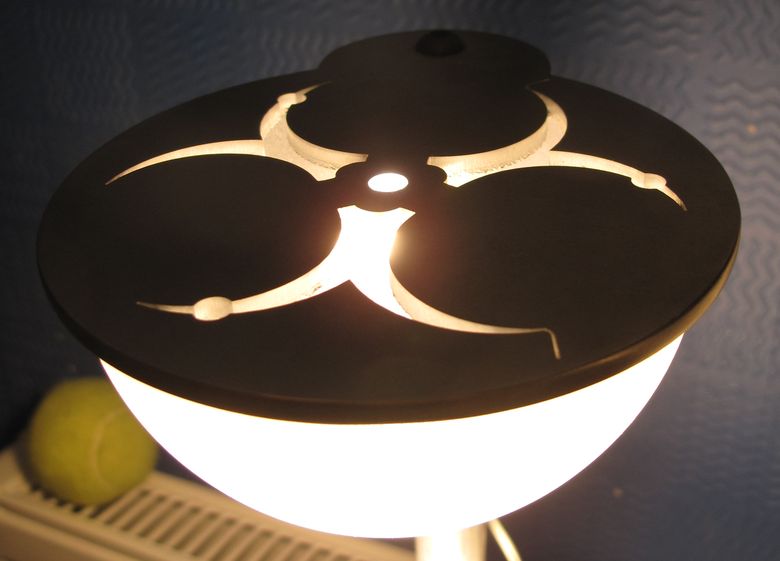
Lamp 1
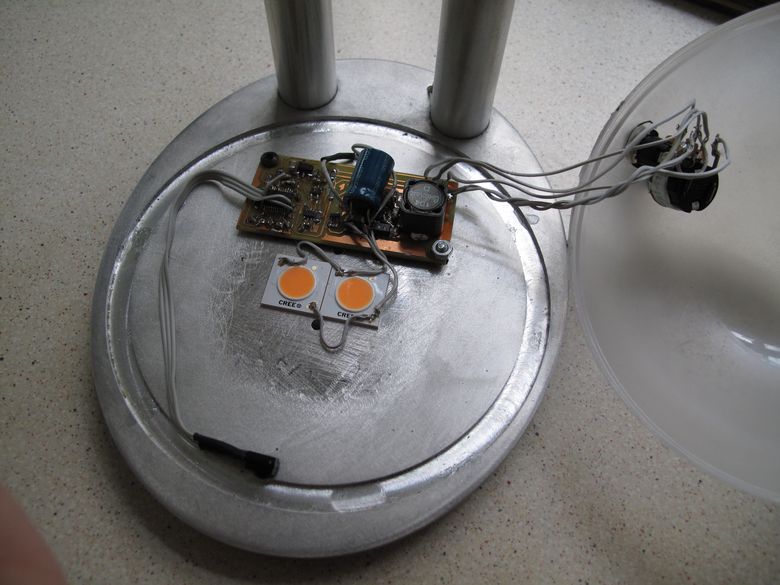
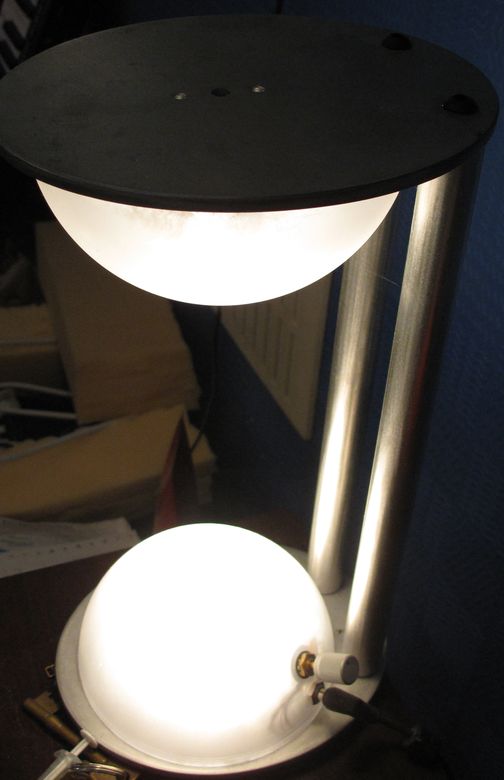
This was designed as a lamp for a bedside table. It uses a ZXLD1371 LED driver in combination with a micro controller for PWM dimming control. Input is provided by a potentiometer that is connected to the micro controllers ADC and an infrared receiver so the light can be operated via remote control. Although largely pointless I also included a separate I2C temperature sensor and DAC. The DAC drives an analogue input pin on the ZXLD1371 to adjust the scaling of the current regulated. The temperature sensor measures the temperature and if the lamp is below a threshold the regulated current will slowly increase until the threshold is met. The current will also be reduced if the lamp gets too hot.
The thermally controlled current loop is only active when the lamp is on the maximum PWM duty cycle. When controlled via remote control the lamp will cycle through three brightness levels, including off, and when controlled via the potentiometer any brightness level can be selected.
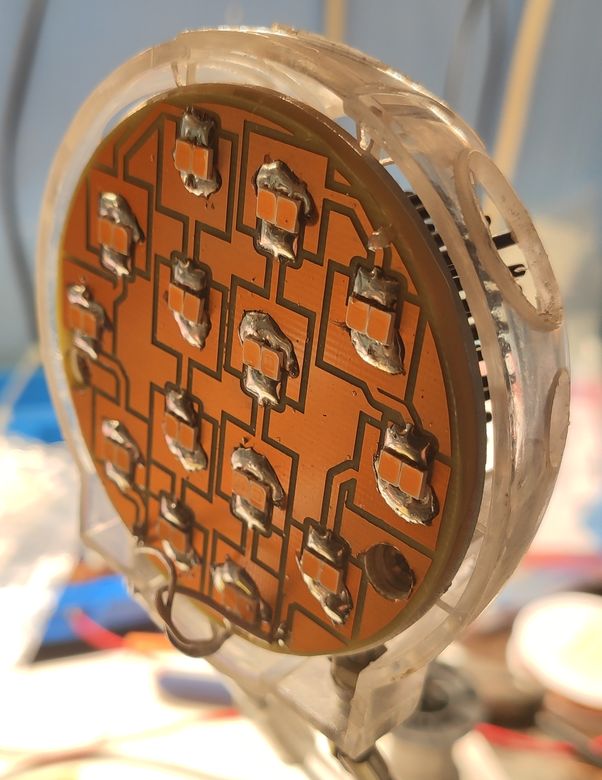
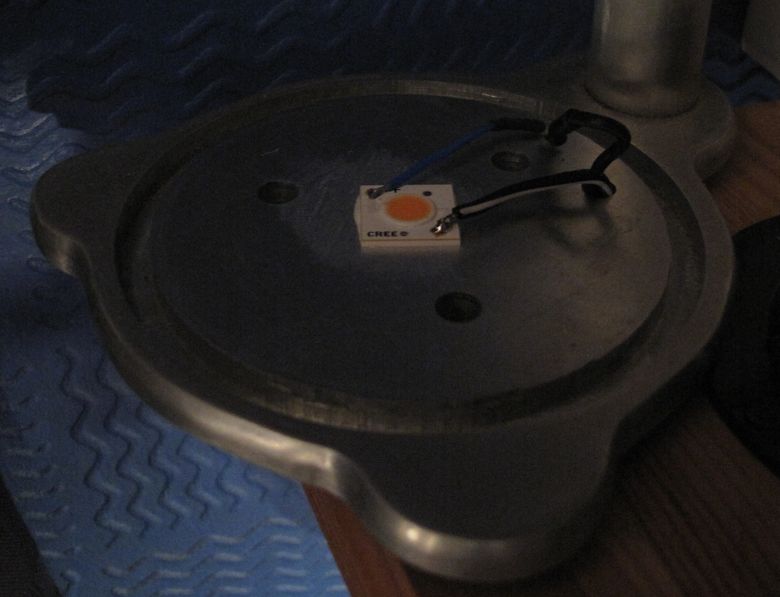
Four CREE CXA1507 LED arrays are used for high efficiency with a CCT of 2700K in a high CRI option.
The lamp was contructed out of aluminium. First I designed a template in some CAD software, printed it out, then glued it to a piece of MDF. The MDF was then trimmed via a sanding disc into the shape of the template. The template was then used in combination with a router and template cutter to produce the shape requried.
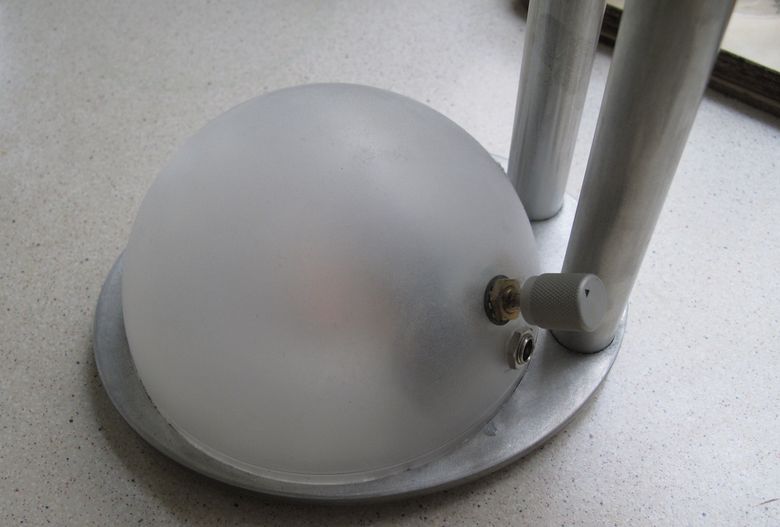
The diffuser is a large diameter 'fillable bauble' these are transparent and made of acrylic. I then spray them with glass frosting.
The thermally controlled current loop is only active when the lamp is on the maximum PWM duty cycle. When controlled via remote control the lamp will cycle through three brightness levels, including off, and when controlled via the potentiometer any brightness level can be selected.
Four CREE CXA1507 LED arrays are used for high efficiency with a CCT of 2700K in a high CRI option.
The lamp was contructed out of aluminium. First I designed a template in some CAD software, printed it out, then glued it to a piece of MDF. The MDF was then trimmed via a sanding disc into the shape of the template. The template was then used in combination with a router and template cutter to produce the shape requried.
The diffuser is a large diameter 'fillable bauble' these are transparent and made of acrylic. I then spray them with glass frosting.

Lamp 2
This lamp came about after I bought a bunch of XPE-HEW LEDs from Farnell. They were being sold for a very attractive price so I couldn't resist. The design was produced in an identical way to Lamp 1.
This uses a MAX16832A LED driver. The XPE-HEW LEDs were 2700K with a CRI of 80. After a couple of years in operation I decided to change out the XPEs for XHGs with a CRI of 90, improving the quality of light and overall efficacy of the light. The diffusers are the same fillable baubles used in lamp 1 and sprayed with glass frosting.
No dimming was included in this design it's simply on or off.
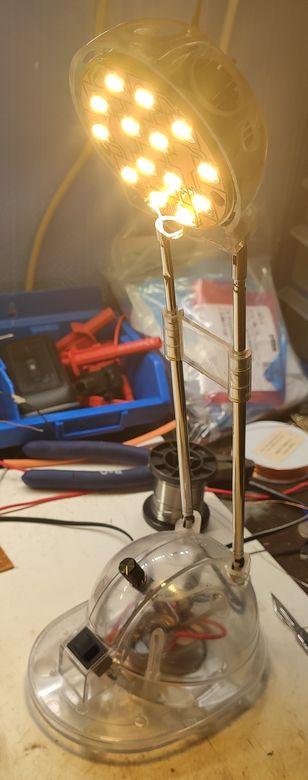
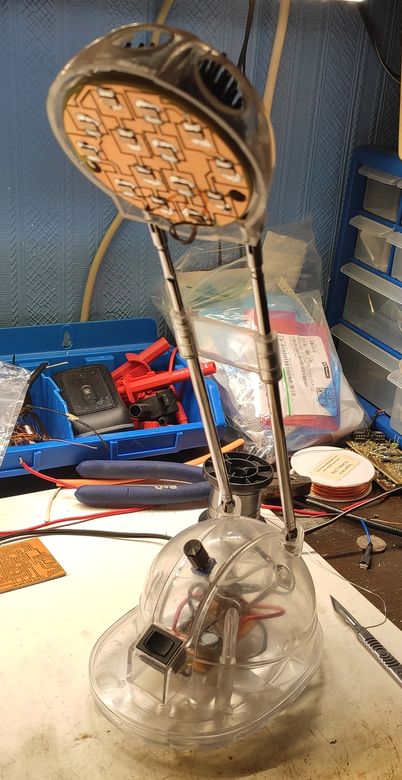
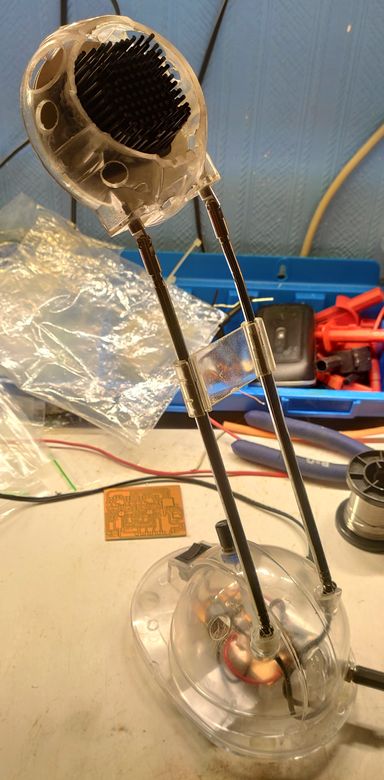
Lamp 3
The same design techniques that were used in lamps 1 and 2 were also used in this design.
One could say that this is basically lamp 1, but spread out across two luminaires. It uses the same ZXLD1371 LED driver in combination with a micro controller for dimming control. It uses a potentiometer + infrared receiver for its inputs but this one doesn't include the temperature control of the first.
High CRI 2700K CREE CXA1304 COB LEDs were used.
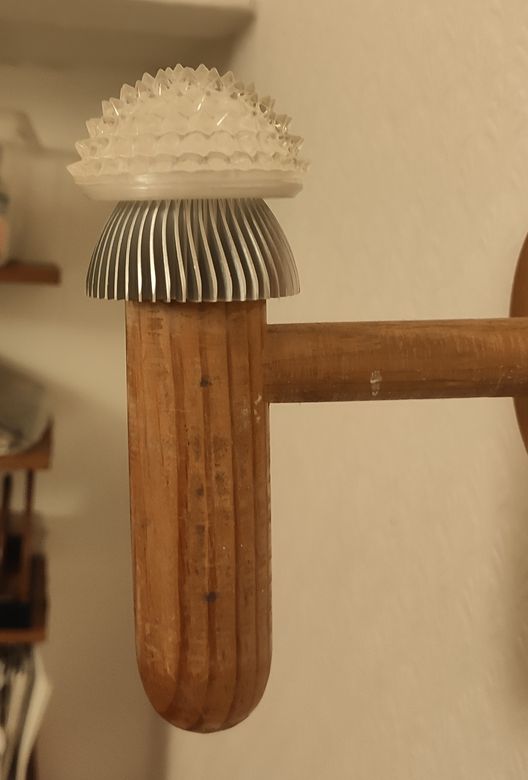
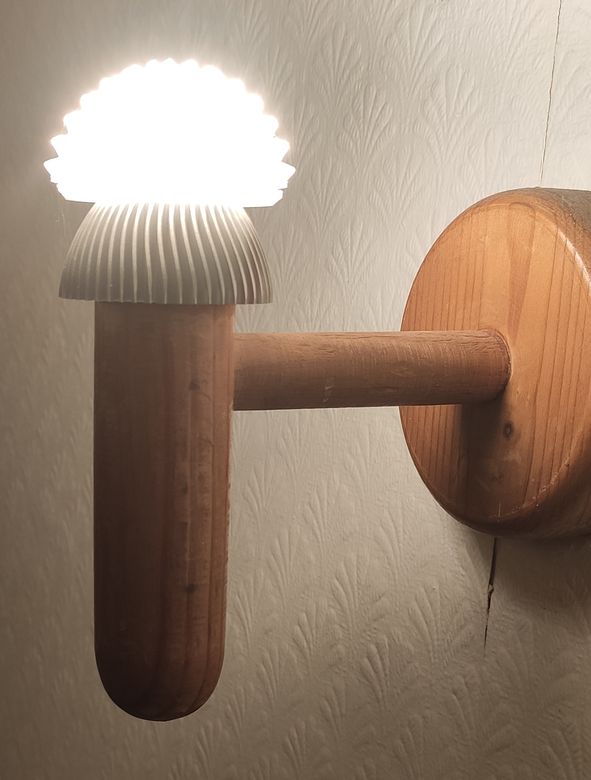
Lamp 4
These are a set of three wall sconces. Originally they used candle style halogen filament bulbs but these kept blowing. The bulbs were then covered by extremely fragile opaque glass globe diffusers. At first I simply modified them into LED lamps and retained the glass globes but this proved futile as they eventually broke. They were decades old mind you but replacing the bulbs stressed the glass out and they gave out.
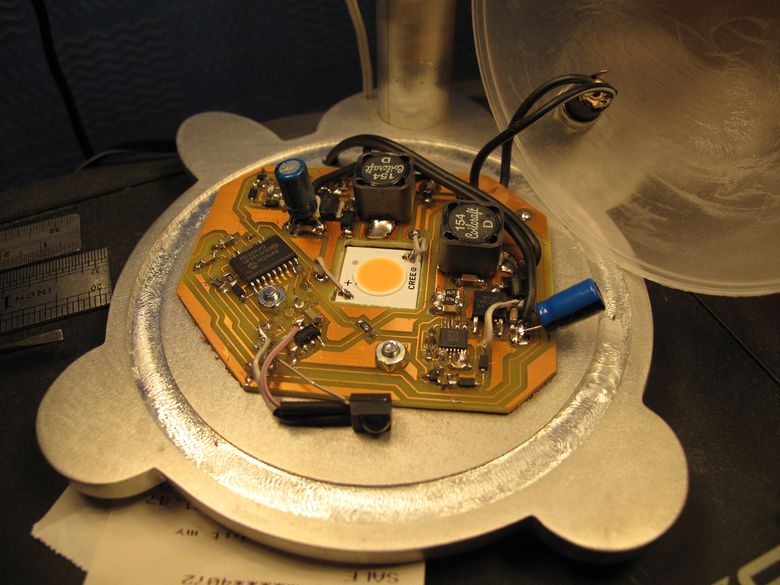
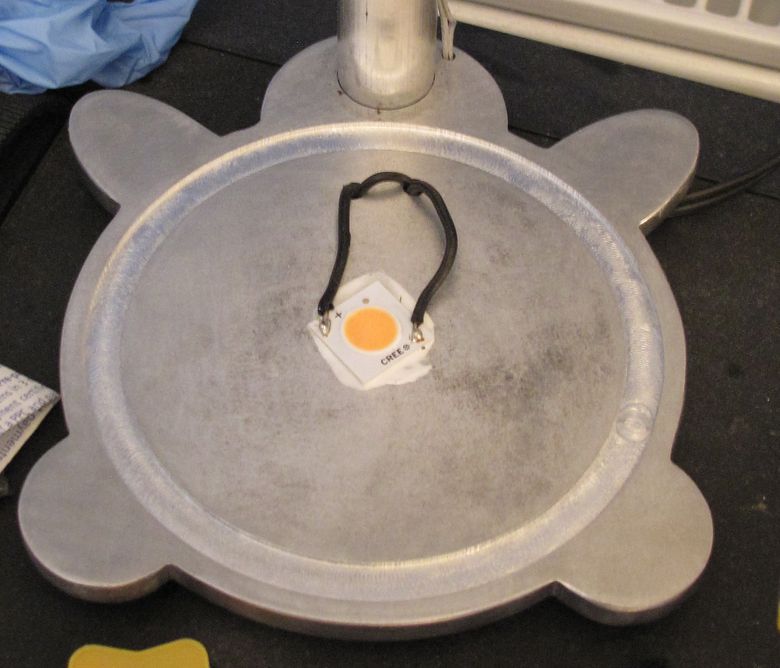
In the second picture you'll see that there is a wooden puck that mounts onto the wall. I hollowed these out, using a router, and made enough space for a small switch mode power supply and the LED driver to fit inside. Again the ZXLD1371 was used but without micro controller so these are simply on or off. The heatsinks were purchased from RS components and were aimed at MR16 replacement bulbs. These are no longer available which is a shame. They were quite expensive individually but they are beatifully built and are very solid.
2700K, high CRI CREE CXA1507s were used and glued to the top of the MR16 heatsinks.
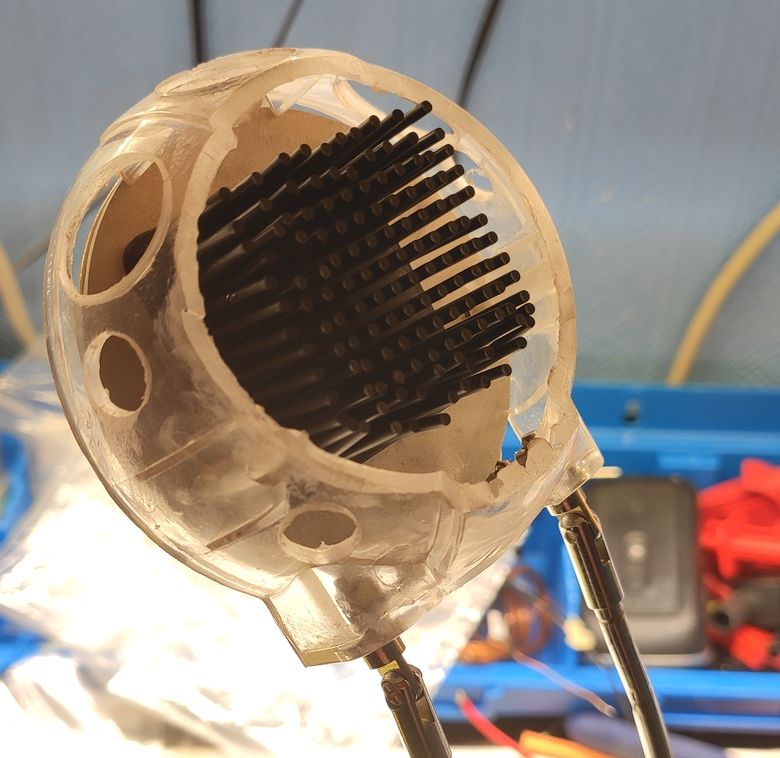
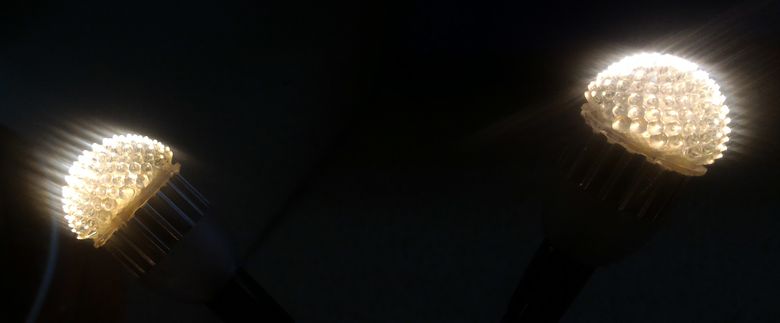
As you can see there are no glass globes in sight. Soon after the glass gave out LEDIL released their ZORYA line of LED lenses/diffusers. These use a rather novel design, channelling the light into small, spike-like, protrusions. The spikes are then able to shine light out in all directions, providing a considerable amount of coverage below angles where a naked LED is incapable. They are also provide an attractive solution too.
In the second picture you'll see that there is a wooden puck that mounts onto the wall. I hollowed these out, using a router, and made enough space for a small switch mode power supply and the LED driver to fit inside. Again the ZXLD1371 was used but without micro controller so these are simply on or off. The heatsinks were purchased from RS components and were aimed at MR16 replacement bulbs. These are no longer available which is a shame. They were quite expensive individually but they are beatifully built and are very solid.
2700K, high CRI CREE CXA1507s were used and glued to the top of the MR16 heatsinks.
As you can see there are no glass globes in sight. Soon after the glass gave out LEDIL released their ZORYA line of LED lenses/diffusers. These use a rather novel design, channelling the light into small, spike-like, protrusions. The spikes are then able to shine light out in all directions, providing a considerable amount of coverage below angles where a naked LED is incapable. They are also provide an attractive solution too.
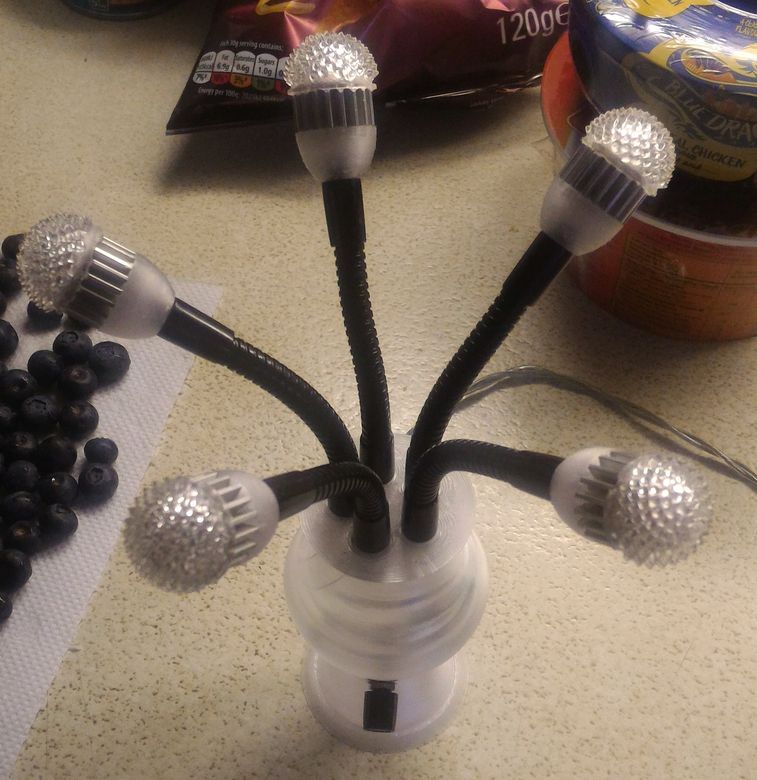
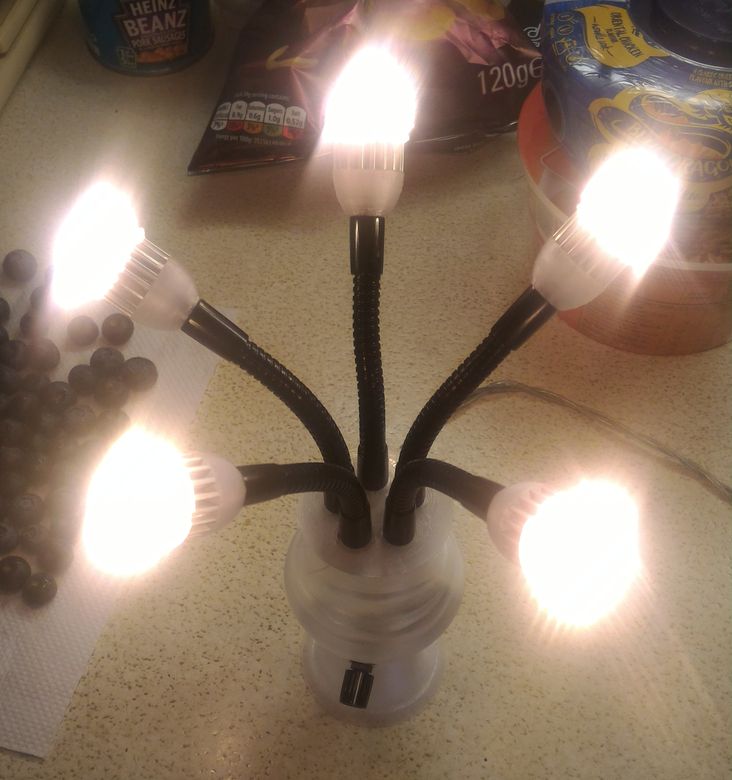
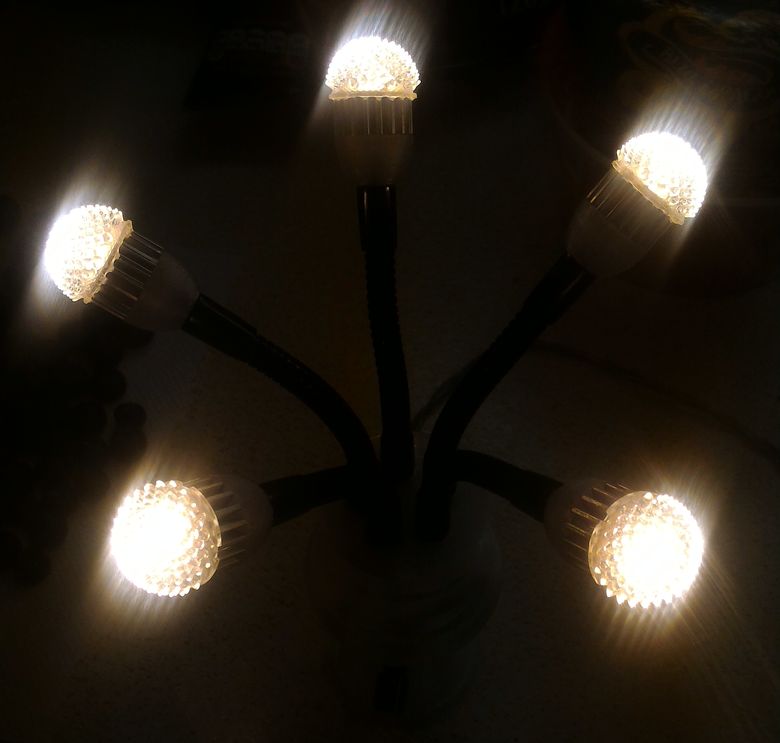
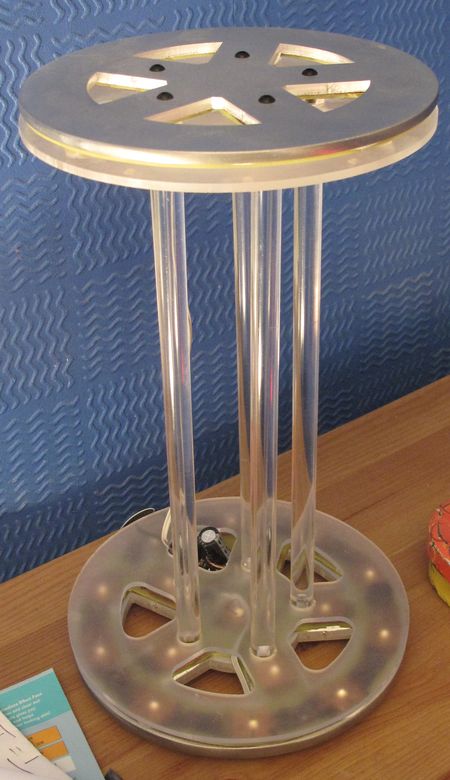
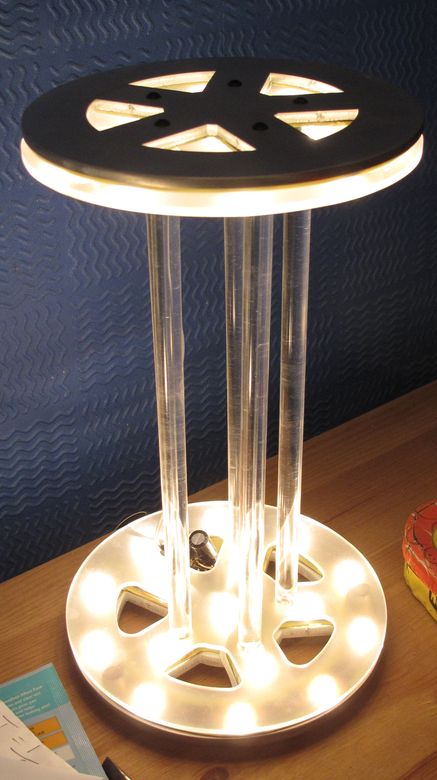
Lamp 5
Following on from the Zorya lamp diffusers above I thought they could do with being used again. They come in two sizes, the large ones above, and the smaller ones used here.
The base of this lamp was 3D printed using PETG with the printer working in vase mode so that the print is a single extrusion thick.
For the individual lights a gooseneck was used to allow the lights to be positioned however one would want. These were purchased from Aliexpress as were the small LED heatsinks. I 3D printed a small mounting piece to sit on top of the gooseneck which then had an LED heatsink glued to it. Lumileds 3535L HE line of LEDs were used in this design with two per light stalk. I used a mix of 2200K CRI in 80 CRI and 2700K in 90CRI. In my opinion this provides a significant improvement in light quality for domestic illumination 2700K appearing a little too cool and 2200K too warm. The small PCB the LEDs are mounted to were glued to the top of the heatsinks with the Zorya diffisers glued over the LEDs.
In this design I chose to use a LT3795 LED driver. This is not a cheap part but it is very easy to work with, very rebust and highly configurable. It might cost a fair bit but it's worth it in my opinion. I went with analogue dimming for this design witha potentiometer mounted to the front in case you want to alter the brightness. I built two of these. One used a pot and the other used remote control for PWM dimming.
The Zorya LEDs certainly give the lamp a rather unique look.

Lamp 6
This design was done for a bit of fun. It's an attempt at a Pokéball from the RPG game/anime series Pokémon. I guess this helps to show the generation I grew up with!
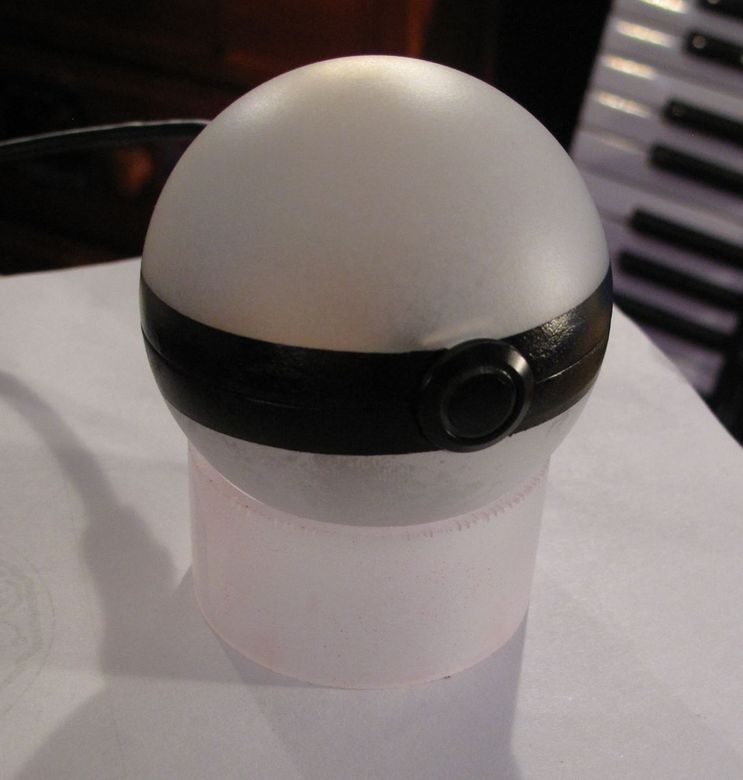
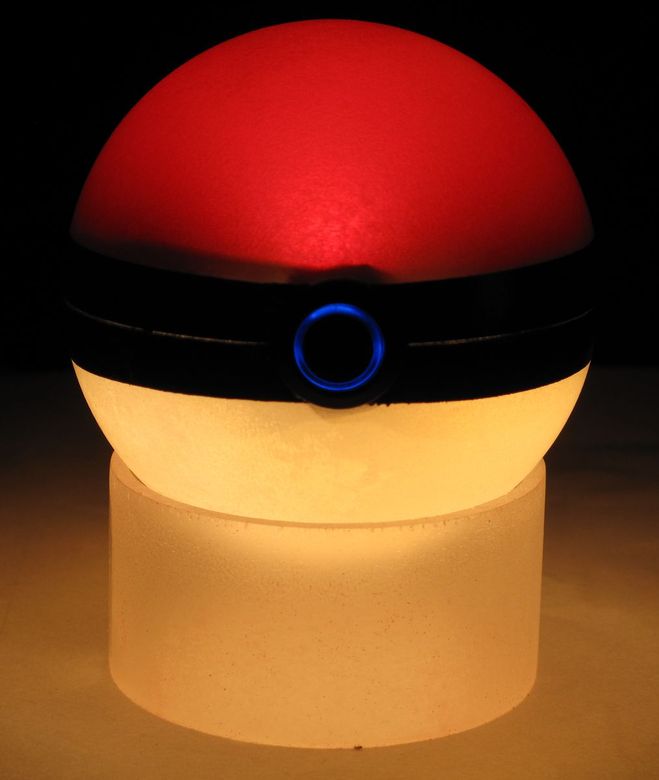
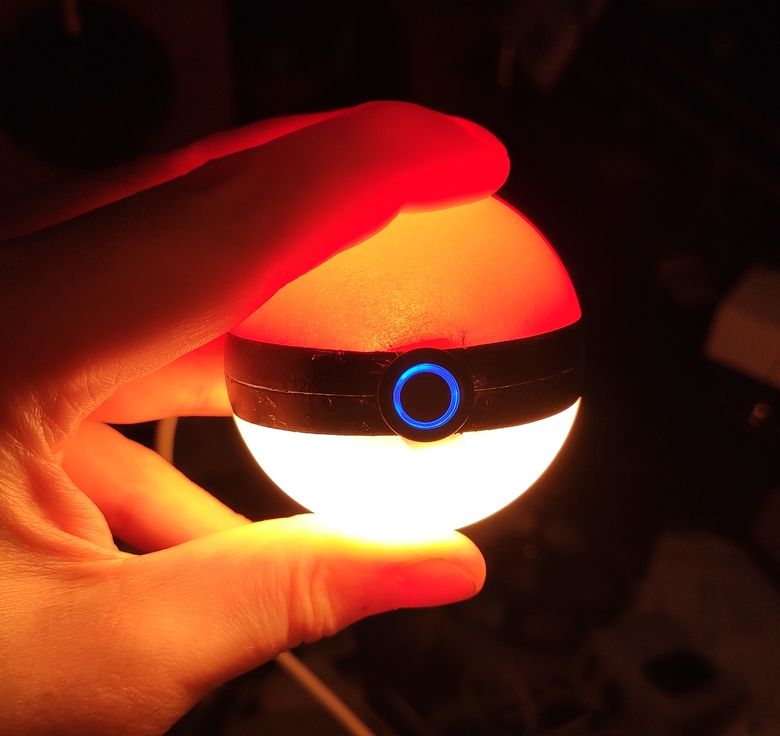
The main ball is made out of a fillable bauble that has been glass frosted. A strip was then taped off and painted black to provide the line down the middle. The button on the front is a standard small diameter, illuminated, anto vandle switch coupled to some logic gates to provide push button operation. The LED driver is a TPS61165 and the ball gets its power from a micro USB connector in the back. The 3535L HE line from Lumileds were used for all of the LEDs. A 2200K/2700K combination on the bottom side and a red LED in the top. Four LEDs in the bottom and a single one top side. I love the way this design turned out.
The main ball is made out of a fillable bauble that has been glass frosted. A strip was then taped off and painted black to provide the line down the middle. The button on the front is a standard small diameter, illuminated, anto vandle switch coupled to some logic gates to provide push button operation. The LED driver is a TPS61165 and the ball gets its power from a micro USB connector in the back. The 3535L HE line from Lumileds were used for all of the LEDs. A 2200K/2700K combination on the bottom side and a red LED in the top. Four LEDs in the bottom and a single one top side. I love the way this design turned out.
Lamp 7 & 8
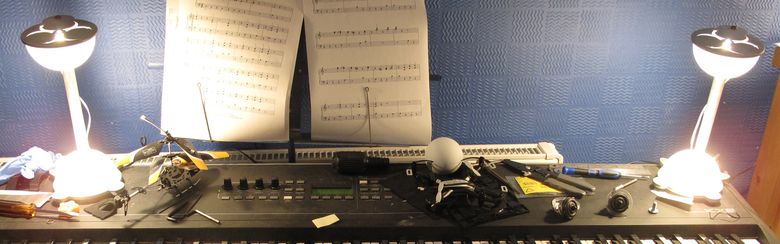
A small lamp designed for a low light output in an area you'd rather wasn't dark at night.
These use the TPA61165 LED driver and the 3535L HE LEDs from Lumileds. Again a combination of the 2200K and 2700K LEDs.
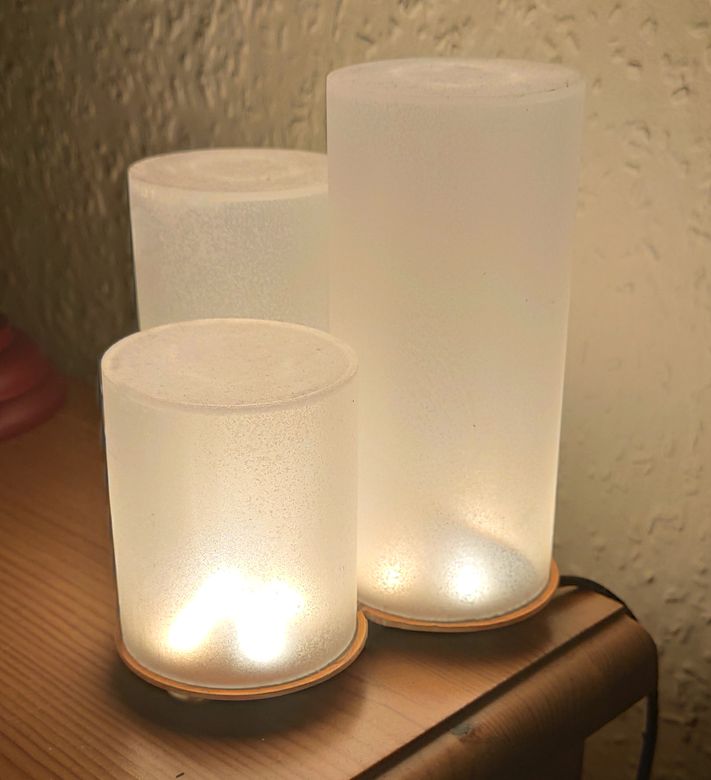
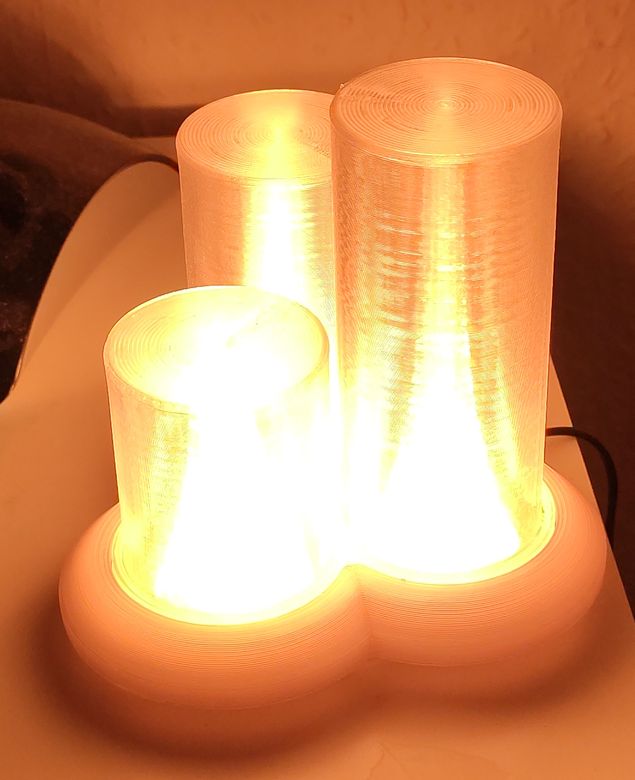
The first design uses perspex cylinders with glass frosting applied for the diffuser.
The second lamp goes a different direction and uses 3D printed cylinders on vase mode. In addition to this a LEDIL ZORYA diffuser is used between the LEDs and the cylinder. I tried using this combination out of curiosity and found that it produces a rather pleasing visual affect. One that changes in shape and intensity as you sit or stand.
These use the TPA61165 LED driver and the 3535L HE LEDs from Lumileds. Again a combination of the 2200K and 2700K LEDs.
The first design uses perspex cylinders with glass frosting applied for the diffuser.
The second lamp goes a different direction and uses 3D printed cylinders on vase mode. In addition to this a LEDIL ZORYA diffuser is used between the LEDs and the cylinder. I tried using this combination out of curiosity and found that it produces a rather pleasing visual affect. One that changes in shape and intensity as you sit or stand.
Lamp 9
Originally lamp 3 fulfilled the duties of this lamp but I wanted something a little brighter.
This lamp is my first forrey into the land of laser cutting. I discovered a laser printing company called lasermaster who would take your DXF files and then turn them into designs cut out of a variety of materials. For my purposes aluminium was absolutely perfect.
Aside from the laser cutting the design is almost identical to design 3. At the time the only available voltage variant of the CXA1507 was the 36V one, at least in the CCT and CRI that I wanted. As the design requires 4 chips I chose to go with 2 LED drivers instead of boosting the input voltage all the way up to 140V. One for the left lamp and one for the one on the right. This design uses the ZXLD1371 in combination with a micro controller for PWM dimming. I decided not to include the potentiometer as they were hardly ever used in the previous designs.
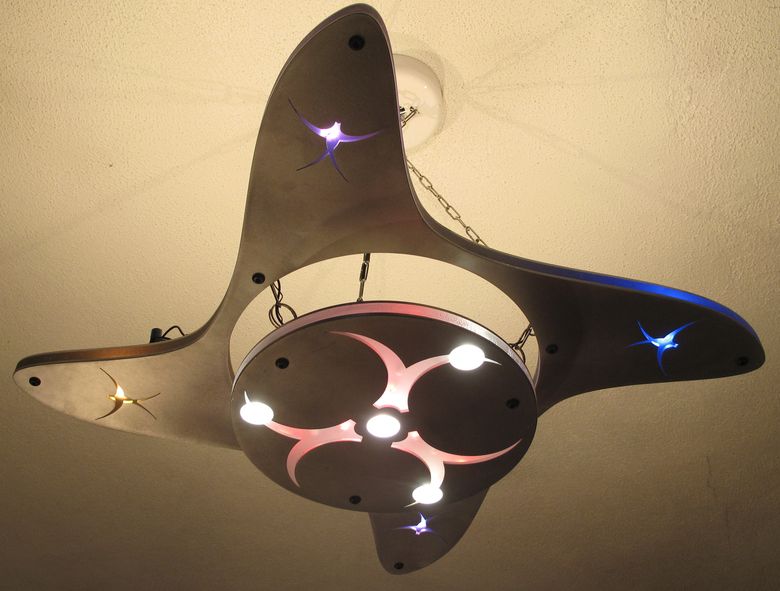
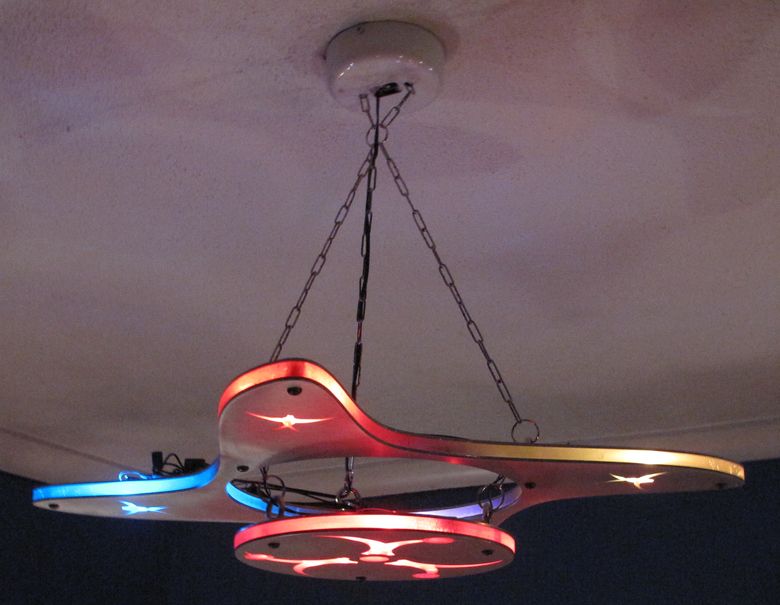
Lamp 10
Next up in the laser printed designs is this one. This design is considerably larger than any of the lamps that I had built before and, as you can see, it hangs from the ceiling.
I had lasermaster laser cut all of the aluminium parts and then I used them as templates for the perspex that is sandwiched within the middle. On each tip of the outer section there is a CXA1304 LED COB array from CREE. These provide the majority of the illumination that this lamp provides with the light reflecting off the ceiling and into the room. Complementing the upward firing LEDs are the 4 LEDs within the central circle. These have 4 OSRAM golden dragon LEDs sitting behind some lenses from LEDIL. The lenses focusing the light into tight beams to provide an attractive visual effect. The lenses are completely transparent and therefore any of the light that bleeds out through the sides illuminates the perspex sandwiched between the aluminium. Adding to this effect are a series of red LEDs that shine down into the perspex. To continue this visual on tips of the outer ring are each fitted with a colour changing LED that slowly cycles through a pattern of colours.
This design uses two LED drivers, one for the white LEDs and one for the colours. Like most of my designs this one also uses a micro controller. This provides PWM dimming for the white LEDs and enables the colour LEDs to be turned on and off independently. A LT3517 is used for the white LEDs and a LT3590 for the colour LEDs. The design is operated via remote control or, alternatively, can be turned on and off using the traditional wall mounted switch.
Lamp 11
Another laser cut design.
This lamp uses the ZXLD1371 in combination with 3535L HE LEDs from Lumileds, a combination of 2200K and 90CRI 2700K LEDs along with a micro controller for PWM dimming and remote control operation.
This lamp uses the ZXLD1371 in combination with 3535L HE LEDs from Lumileds, a combination of 2200K and 90CRI 2700K LEDs along with a micro controller for PWM dimming and remote control operation.
Lamp 12
Although not really a lumiare this is still a design I am most proud of. It looks stunning in operation and completely changes the aesthetic and atmosphere of the room.
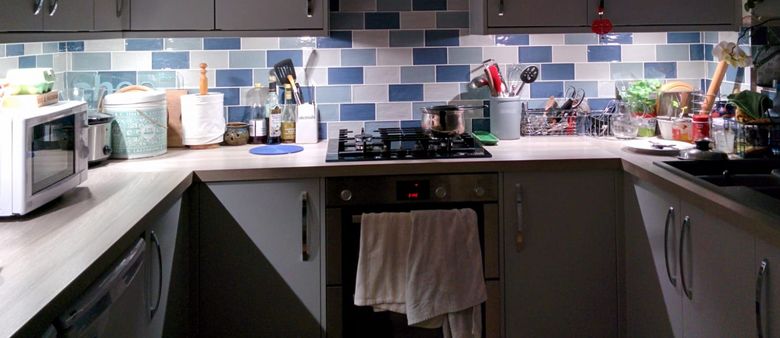
A couple of years ago one of my Aunts moved house and soon after she'd had the kitchen redone. As soon as I saw it I knew it needed some under cabinet lighting. This was originally done out of practicality as you were always standing in your own shadow when trying to work at any of the surfaces. Not what you want when sharp knives and hot things are involved.
I already had some LEDIL LED lenses, designed specifically, for this kind of job. These provide an asymmetric light beam to focus the light right where it's needed, rather than in most designs that would flood light in all directions. The LED modules are mounted at the front of the cabinets just behind the protruding, cosmetic, lip that runs along the underside of the cabinets. The lenses focusing the light down, away, towards the walls, and to the sides. This design uses CREEs J-series 2835 LEDs in 4000K at 90CRI. These are driven by a power supply I bought from Aliexpress and, although it came without any kind of EMI filtering on its input, it works very well. Obviously I added some filtering.
Lamp 13
Almost everyone who needs good lighting at a desk has used something like this. Usually they come with a halogen bulb and old school linear transformer mounting in the base. They work well. The weight of the transformer keeps them stable and the halogen light provides a decent amount of light. Trouble is the bulbs are incredibly fragile. Accidentally knock the lamp over and more often than not the bulb would blow. And even if you prevent them from falling over the lamps don't last that long anyway. Clearly they are the perfect target for an LED retrofit so that's exactly what I did.
Originally this design used a CXA1507 COB LED from CREE but this needed replacing after it got damaged when the lamp fell on the floor. Now the design uses a number of 2835 J-series LEDs from CREE. 90CRI 2700K parts. The LED driver is an LT3795 and includes analogue dimming.
Originally this design used a CXA1507 COB LED from CREE but this needed replacing after it got damaged when the lamp fell on the floor. Now the design uses a number of 2835 J-series LEDs from CREE. 90CRI 2700K parts. The LED driver is an LT3795 and includes analogue dimming.