SB17NBAC Coaxial
This project was born out of a conversation and collaboration with tktran303 over on the DIYAudio forums.
There was a joint interest in creating a decent coaxial driver based on one of the drivers from SB Acoustics standard range of drivers. These have been out for many years but SB really put themselves on the map with this range. First and foremost the SBA range has always been priced on the right side of affordable and when you're thinking of chopping a driver up this is definitely a concern! You don't want to take a scalpel, or heat gun, to a driver you've paid an arm and a leg for. Secondly they've always had class leading performance when it comes to the midrange with extremely low harmonic distortion. SB also brought to the plate their ribbed metal cones and effectively eliminated the harmonic distortion peaks typically associated with hard cones.
Out of all SBs cone materials it was decided that one of the metal cones would make the most sense for modification. They have the same performance of the ceramic drivers, but aren't as expensive, and as heat was going to be used, to encourage the glues to soften, plastic, or paper, didn't make a lot of sense. Both the SB15 and SB17 size of drivers were of interest so both were purchased. After some modification it quickly became apparent that the smaller voice coil of the SB15, coupled with the minimal depth above the pole piece, really limited tweeter selection. The minimal depth is a result of the raised copper caps that SB use. The standard range employ a similar motor design to the Satori range and can be seen in the Saton design here. Obviously the copper cap doesn't help when it comes to fitting in a tweeter. Like the MW13 the only tweeter that would really fit was the ND16 from Dayton Audio.
The SB17 also uses a similar copper cap but the wider voice coil diameter allows for bigger tweeters to fit. Another factor is that, due to the very wide surrounds that SB use, the actual cone diameter on the SBA drivers is relatively small when compared to the basket diameter. Half of the point of a coax is the directivity control that the cone of the midrange provides for the tweeter and the smaller cone of the SB15 really didn't make a lot of sense.
The SB17NBAC35-4 was the driver of choice for this project and that's what you'll see here.
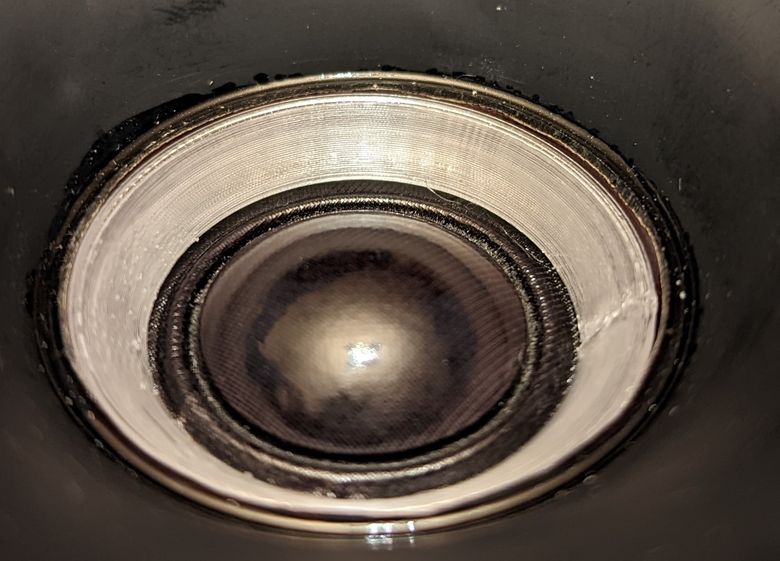
For turning any woofer into a coaxial the very first thing you need to do is remove the dust-cap. For the MW13P I used a scalpel to cut the paper cap off but for the metal driver that wasn't necessary. I used a hot air gun to heat the dust-cap and once warmed up the cap lifted cleanly off the cone only leaving behind a ring of glue. The voice coil former was also too long and protruded forward of the cone. This needed trimming down with a scalpel for a smooth interface between the cone and voice coil.
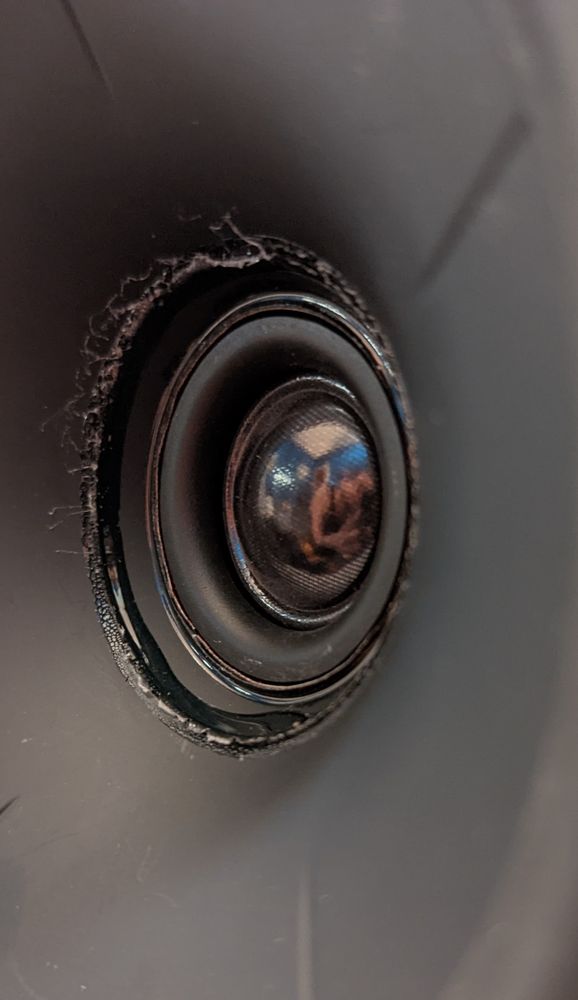
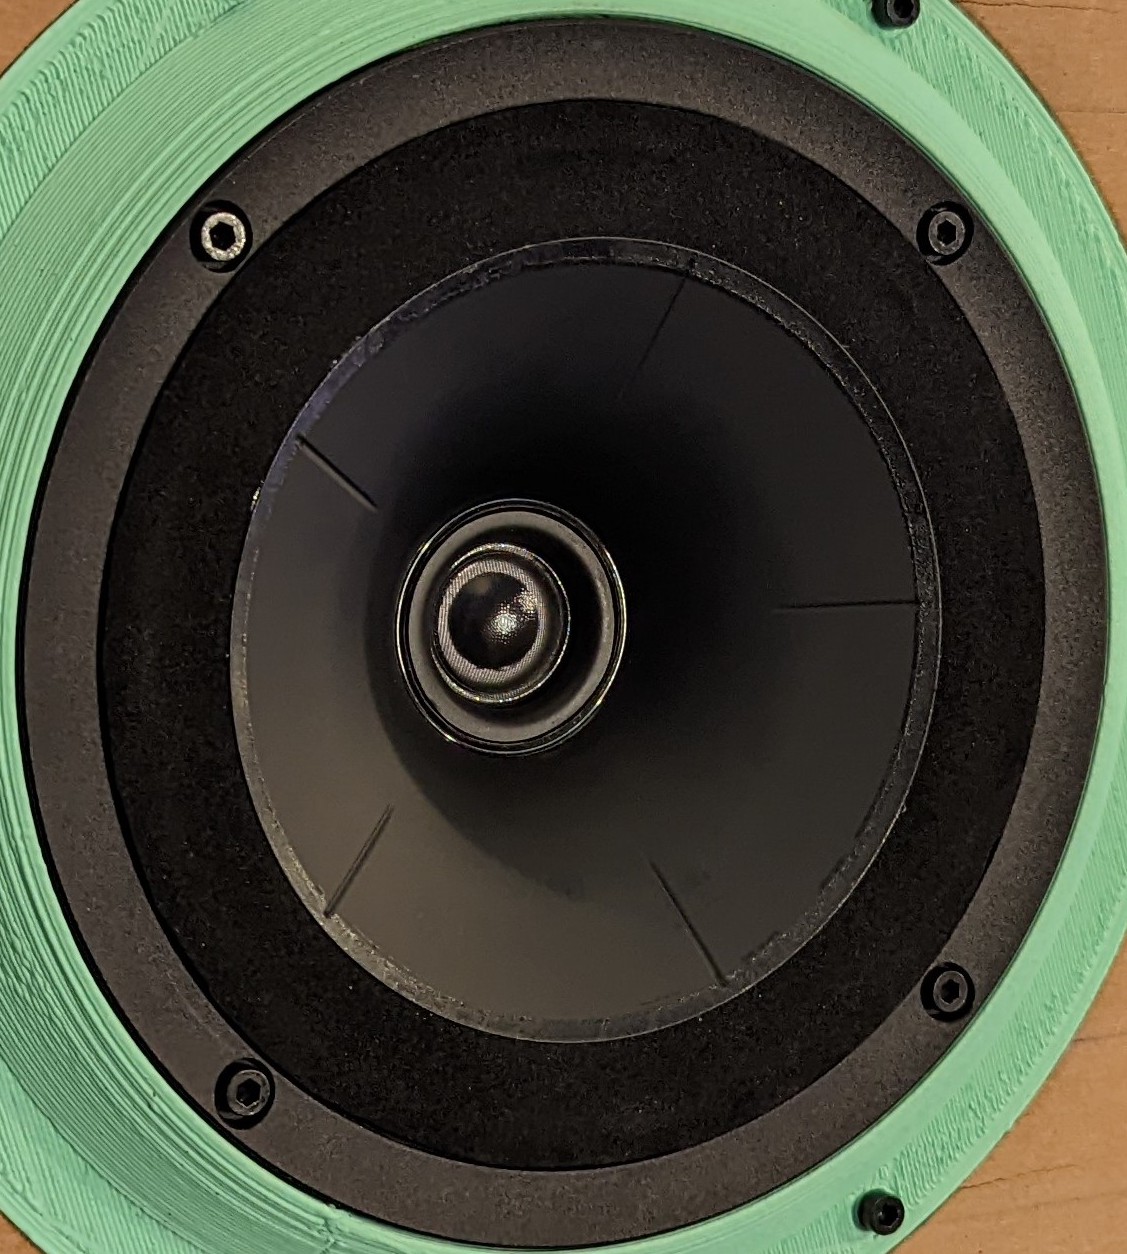
Below is what this looks like with a preliminary test with a Dayton ND20FA tweeter.
There was a joint interest in creating a decent coaxial driver based on one of the drivers from SB Acoustics standard range of drivers. These have been out for many years but SB really put themselves on the map with this range. First and foremost the SBA range has always been priced on the right side of affordable and when you're thinking of chopping a driver up this is definitely a concern! You don't want to take a scalpel, or heat gun, to a driver you've paid an arm and a leg for. Secondly they've always had class leading performance when it comes to the midrange with extremely low harmonic distortion. SB also brought to the plate their ribbed metal cones and effectively eliminated the harmonic distortion peaks typically associated with hard cones.
Out of all SBs cone materials it was decided that one of the metal cones would make the most sense for modification. They have the same performance of the ceramic drivers, but aren't as expensive, and as heat was going to be used, to encourage the glues to soften, plastic, or paper, didn't make a lot of sense. Both the SB15 and SB17 size of drivers were of interest so both were purchased. After some modification it quickly became apparent that the smaller voice coil of the SB15, coupled with the minimal depth above the pole piece, really limited tweeter selection. The minimal depth is a result of the raised copper caps that SB use. The standard range employ a similar motor design to the Satori range and can be seen in the Saton design here. Obviously the copper cap doesn't help when it comes to fitting in a tweeter. Like the MW13 the only tweeter that would really fit was the ND16 from Dayton Audio.
The SB17 also uses a similar copper cap but the wider voice coil diameter allows for bigger tweeters to fit. Another factor is that, due to the very wide surrounds that SB use, the actual cone diameter on the SBA drivers is relatively small when compared to the basket diameter. Half of the point of a coax is the directivity control that the cone of the midrange provides for the tweeter and the smaller cone of the SB15 really didn't make a lot of sense.
The SB17NBAC35-4 was the driver of choice for this project and that's what you'll see here.
For turning any woofer into a coaxial the very first thing you need to do is remove the dust-cap. For the MW13P I used a scalpel to cut the paper cap off but for the metal driver that wasn't necessary. I used a hot air gun to heat the dust-cap and once warmed up the cap lifted cleanly off the cone only leaving behind a ring of glue. The voice coil former was also too long and protruded forward of the cone. This needed trimming down with a scalpel for a smooth interface between the cone and voice coil.
Below is what this looks like with a preliminary test with a Dayton ND20FA tweeter.
With care the glue can be encouraged away from the cone using a small plastic style of spatula.
If you're wanting to use the driver as a mid/bass, in a two way design, here is where your driver disassembly ends. But if you're really after the best performance then you need to remove the surround as well. The usual half-roll surround is a nightmare for diffraction and causes a bunch of nonsense in the tweeters response. The surround is literally a bump in the road of the cone profile that's acting as a waveguide for the tweeter and it has to go.
Removing the surround wasn't half as easy as the dust cap but a similar procedure was used. With heat applied to the edge of the cone the surround separated quite easily but the chassis was another story. Heat aided in its separation but the surround ended up destroyed with bits of rubber left stuck to the basket.
Once the surround was removed a replacement was necessary and what's needed is something flat and smooth. The easiest solution to this is to use a ring of foam, very similar to what Audax did with their PR17M0 decades ago. The thinner the foam the better as the lighter it is the higher the sensitivity of the driver. I could easily source 1mm thick, closed cell, neoprene foam, so this is what I went with. I chose neoprene on purpose for its solvent resistance. I already had some E8000 glue and didn't want the foam to disintegrate when using it. Ideally the foam would be even thinner but that wasn't easy to find.
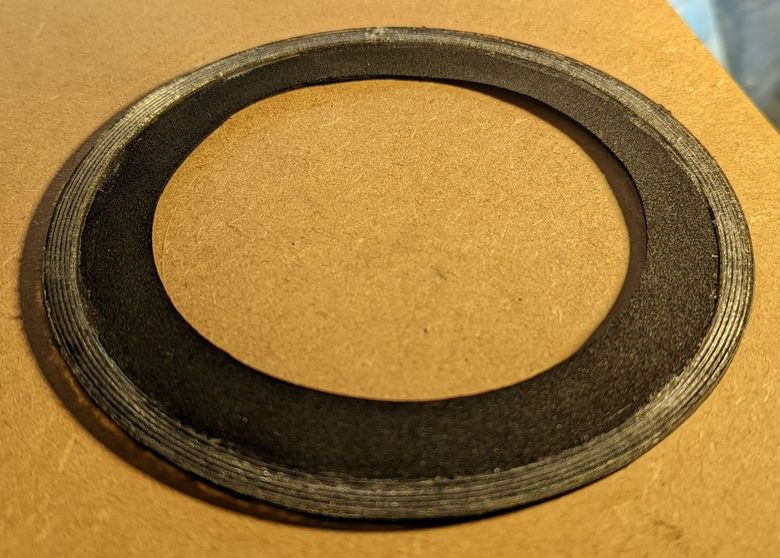
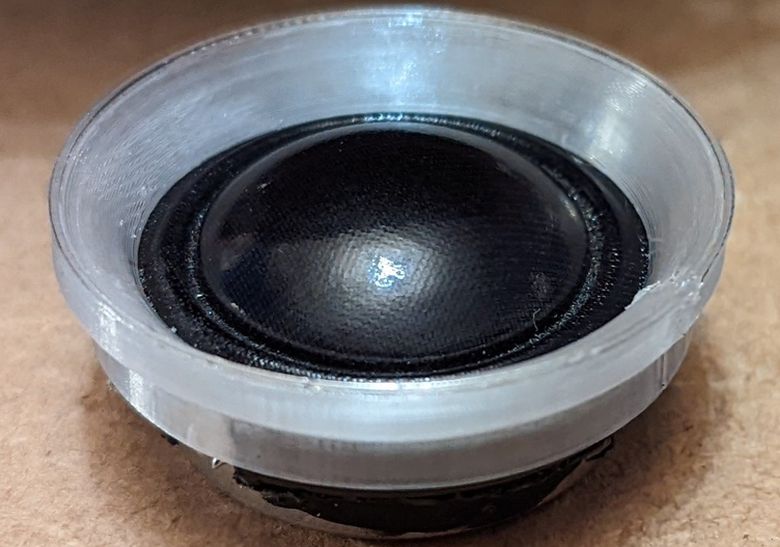
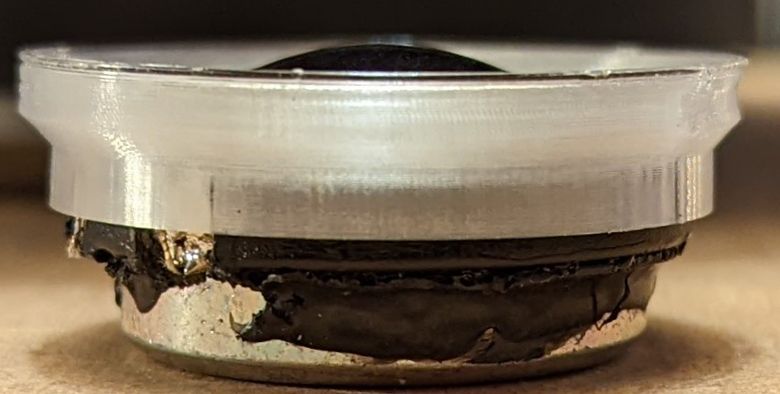
After removing the surround of the SB17 you quickly realise that the cone actually sticks out a little in comparison to the ledge that the surround sticks to on the basket. The new foam surround therefore needed to be lifted up a smidgen to mate well with the cone. I 3D printed a small ring to accomplish this task.
Below is an image that shows the 3D printed ring glued to the neoprene foam ring.
If you're wanting to use the driver as a mid/bass, in a two way design, here is where your driver disassembly ends. But if you're really after the best performance then you need to remove the surround as well. The usual half-roll surround is a nightmare for diffraction and causes a bunch of nonsense in the tweeters response. The surround is literally a bump in the road of the cone profile that's acting as a waveguide for the tweeter and it has to go.
Removing the surround wasn't half as easy as the dust cap but a similar procedure was used. With heat applied to the edge of the cone the surround separated quite easily but the chassis was another story. Heat aided in its separation but the surround ended up destroyed with bits of rubber left stuck to the basket.
Once the surround was removed a replacement was necessary and what's needed is something flat and smooth. The easiest solution to this is to use a ring of foam, very similar to what Audax did with their PR17M0 decades ago. The thinner the foam the better as the lighter it is the higher the sensitivity of the driver. I could easily source 1mm thick, closed cell, neoprene foam, so this is what I went with. I chose neoprene on purpose for its solvent resistance. I already had some E8000 glue and didn't want the foam to disintegrate when using it. Ideally the foam would be even thinner but that wasn't easy to find.
After removing the surround of the SB17 you quickly realise that the cone actually sticks out a little in comparison to the ledge that the surround sticks to on the basket. The new foam surround therefore needed to be lifted up a smidgen to mate well with the cone. I 3D printed a small ring to accomplish this task.
Below is an image that shows the 3D printed ring glued to the neoprene foam ring.
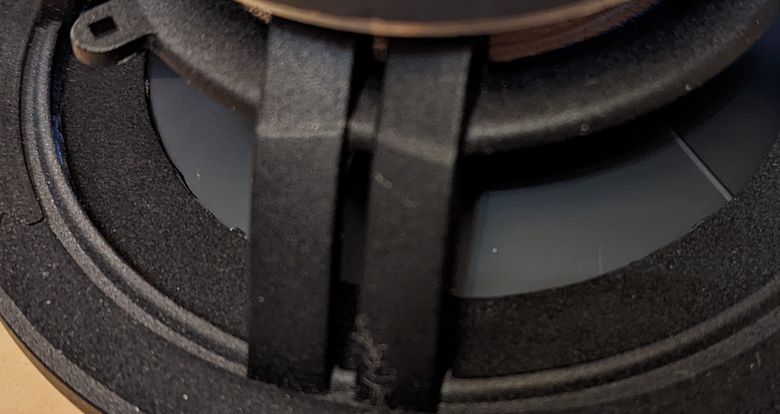
The next thing to do is glue the new surround and 3D printed ring to the basket of the driver. This is very straight forward and once the glue is set it's time to stick the new surround to the cone. Originally I wanted to glue the surround to the top of the cone, and over the old glue line, but once the surround was glued to the basket it was obvious that this wasn't the way things wanted to go. The surround fell into place to the rear of the cone.
With the old surround removed the front of the cone is free to wobble about and before gluing the new one into place it's necessary to recentre the cone. To do this I used a bunch of paper shims to lock the voice coil in place.
With the old surround removed the front of the cone is free to wobble about and before gluing the new one into place it's necessary to recentre the cone. To do this I used a bunch of paper shims to lock the voice coil in place.
The first thing to do after replacing the surround was to get a tweeter in the voice coil and check the performance. As mentioned above I chose an ND20FA for this role as I had one sitting on a shelf. It turned out to be pretty perfect in shape and size with the only necessary modification being to trim down the flange it comes with. This was the result.
It fitted almost perfectly but how does it measure? From previous experience I already knew that a flat section around the tweeter leading up to the voice coil was a big no. The trimmed ND20FA has a very small flat section of flange so I was interested to see how much it would impact the performance.
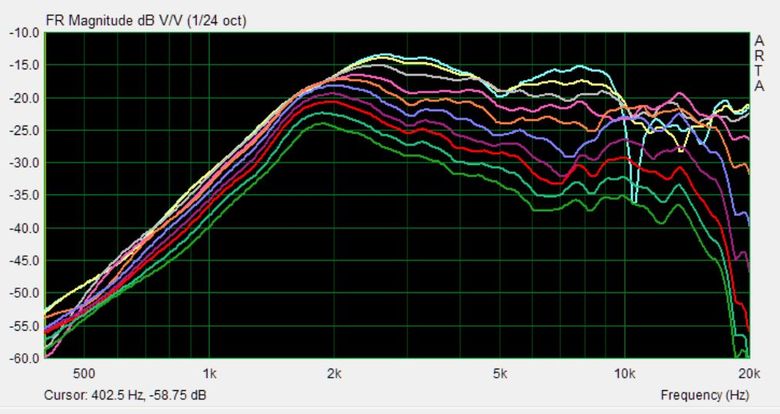
It turns out not so much but things are far from being perfect. The on-axis is a mess. This is to be expected but lets look at this a little closer up.
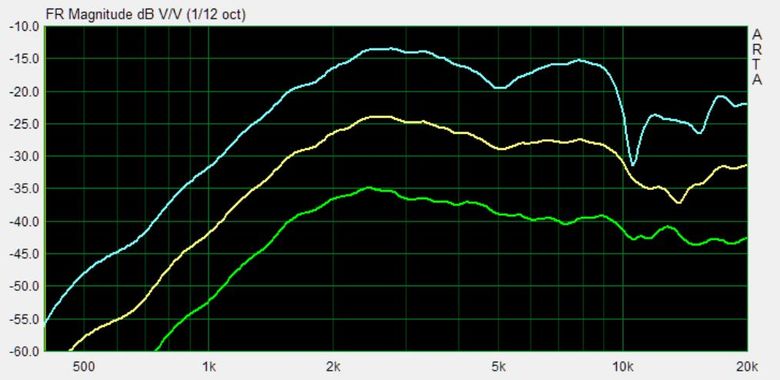
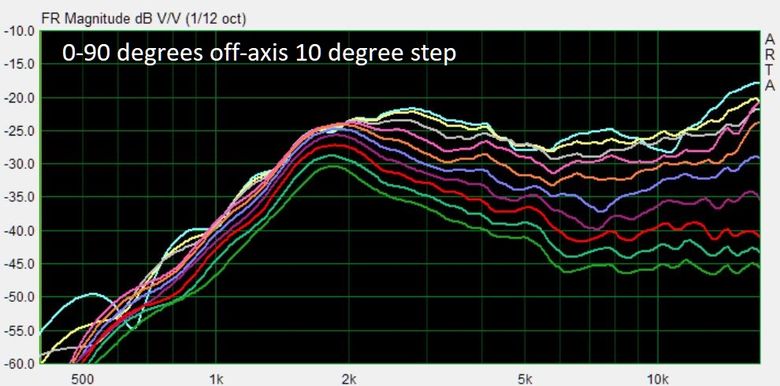
Here we've got the on-axis, 10, and 20 degree off axis responses separated by 20dB for greater clarity. As you can see it takes until 20 degrees for things to flatten out. Not ideal but not a complete disaster. The other thing you can see in the image with all the off-axis curves (0-90 degrees in 10 degree steps) is that the directivity starts to widen around 8kHz, again, less than ideal. Still lets see what a normalised contour plot looks like.

Once again we see the widening at 8kHz but also the, top octave, suck-out, on axis is very clear. We start to control directivity properly around 2.5kHz.
I wasn't happy with this I wanted to do better. First of all I tried putting phase shields in front of the tweeter dome and this didn't really do anything worthwhile. The on-axis was still a mess and we still had the widening. I then tried taking some wire cutters to the tweeter and, much to my surprise, the plastic flange fell off.
I wasn't happy with this I wanted to do better. First of all I tried putting phase shields in front of the tweeter dome and this didn't really do anything worthwhile. The on-axis was still a mess and we still had the widening. I then tried taking some wire cutters to the tweeter and, much to my surprise, the plastic flange fell off.
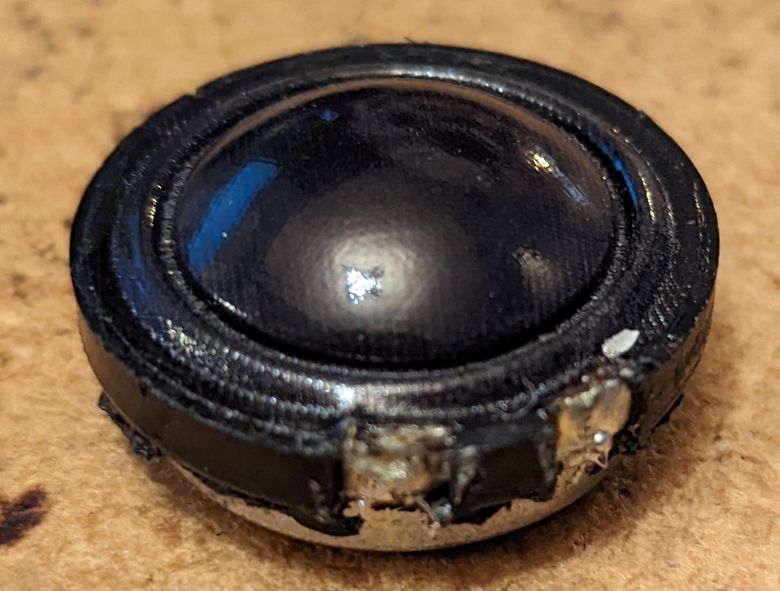
This is what's left of the ND20FA once the flange has been removed. Not a lot! But I thought I can do something with that so drew up the plans for a new flange for the 3D printer.
This improved things a little, but not by much, so I loaded up Axidriver and started to simulate what flange shape should provide the best response. Simulation proved fruitful, and small gains were achieved, but nothing outstanding. The widening of dispersion was still a problem as were the on-axis issues. I wasn't too concerned with the on-axis response but I did want to try and tackle the widening of dispersion. Axidriver indicated that this could be down to the cone geometry, and if that was true, there wasn't a lot I could do about it anyway. The SB17s cone isn't straight sided it's made up of two profiles. A steeper one near the voice coil and a shallower one near the surround with a smooth transition between the two. Altering the geometry in simulation had quite significant effects on the way the cone affected the overall dispersion of the tweeter.
Well that was it and I thought I was done. I'd have to accept that there was an inherent limitation as imposed by the SB17s cone but then something clicked and a solution was found. This ended up producing the contour plot below...
Well that was it and I thought I was done. I'd have to accept that there was an inherent limitation as imposed by the SB17s cone but then something clicked and a solution was found. This ended up producing the contour plot below...
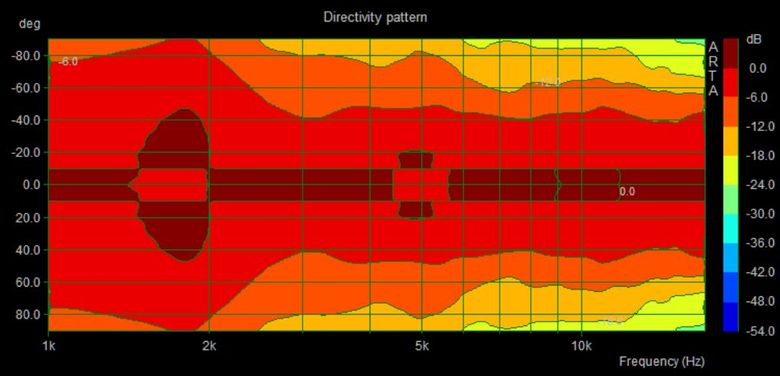
Perfection. Directivity control kicking in just below 2kHz and providing, uniform, controlled directivity all the way up. Here are a few more of the more typical off axis curves for the sake of clarity.
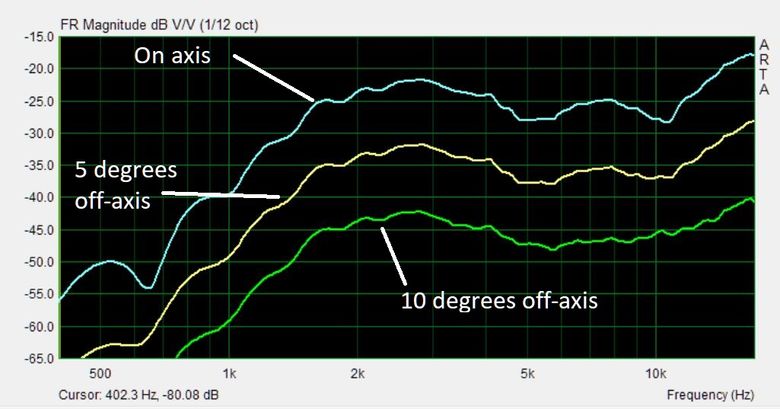

First of all are the 0, 5 and 10 degree axis plots. The tweeter has a rising response, which is easily equalised, as is the rising response towards the low end from the waveguide. With those taken care of the tweeter is flat to within about +-1.5dB on axis. Very quickly, by 10 degrees this time, the response completely flattens out. A significant improvement Vs the Dayton.
The rest of the off-axis plots show the response out to 90 degrees with the final one removing the on-axis for greater clarity of the near off-axis curves. This is essentially textbook performanc,e with only a few minor issues, and with true optimisation, rather than cutting up drivers, they can most likely be resolved.
But enough of that what of the midrange of the SB17? How did that measure up with the replaced surround?
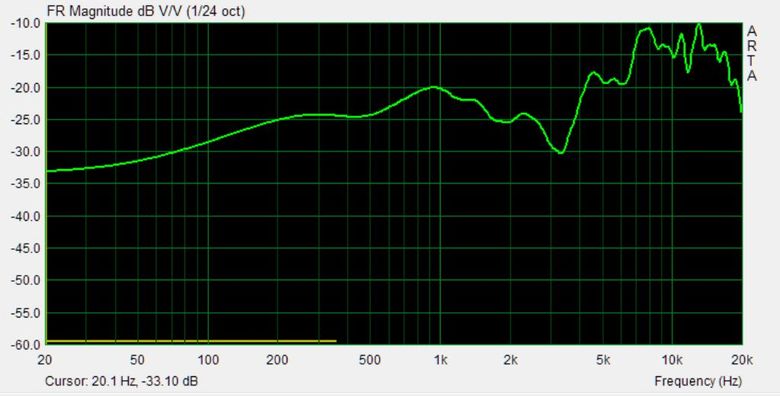
First of all the on-axis frequency response. Here is the simulated diffraction effects of the box it's in.

If you take into consideration the way the box is going to be affecting the response the midrange is pretty flat. The break-up goes wild, as with any aluminium cone, and this will require attention and probably a bottomless notch.

Distortion at 2.83V is impressively low and apparently the drivers sensitivity has also increased by a dB or two according to the measured T/S parameters but it'd difficult to say without knowing the exact surface area of the new driver.
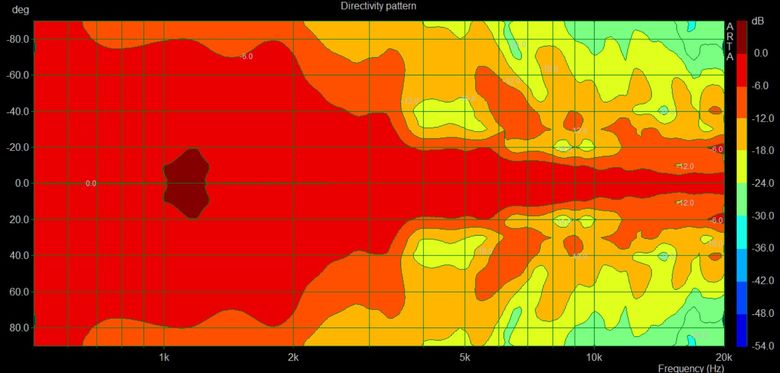
Here is the off-axis response as a contour plot. As can be seen the directivity of the woofer, at about 2.5kHz, matches that of the tweeter. This would make a perfect crossover frequency with steep, 4th order, acoustic, slopes.
The only thing the SB17 really needs is the small holes in the voice coil former sealing, but other than that this was quite a success.
So there you have it driver unit manufacturers, how to make a good coaxial driver.
1) Use a flat surround if on a midrange.
2) Make sure the tweeter is mounted flush within the voice coil. It cannot stick forward of the cone.
3) Do not have flat sections going from the edge of the tweeter to the inner face of the voice coil they must be angled for best performance.
4) ?
5) Profit.