FSTNT1
Here is a design that is somewhat different to most of the others found here. Whereas most of my projects are one offs this one has evolved slowly over time and, in its entirety, probably will continue to do so.
This system/loudspeaker represents my main hifi system, sees the most use and incorporates design elements that typically cost the most and have the highest overall performance. It's also the largest system which naturally lends itself towards higher overall performance.
The overall idea for this design came about when I first started experimenting with waveguides. For years I had this idea in my head of how I wanted a hifi system to sound and nothing I experimented with managed to give me what I ultimately wanted.
"What?" I hear you say. "You were trying to design a hifi system that sounded like an idea of something that only existed in your head?"
When looked at like that it does seem a little ridiculous. Usually one puts the goal posts in a place they know is achieable, at least in terms of being scientifically possible. Yet my main driving force in trying out new approaches to stereophonic reproduction all revovled around this idea of perfection, or at least something approaching this idea, that I had in my head.
Whatever the reason for experimenting things finally started to fall into place when I began investigating the speakers off axis response. Note that this has abosolutely nothing to do with eliminating the usual wide-narrow-wide dispersion profile that so many loudspeakers suffer from but everything to do with the high frequency radiation profile.
For years I had been reading that having excellent high frequency off axis dispersion is a good thing but what exactly does 'excellent of axis dispersion' actually mean?
In most circles this means something that a 19mm tweeter does better than a 25mm dome tweeter. In other words a tweeter that beams less. Where this idea originally came from I have no idea but it seemed like everyone seemed to think this was a good thing.
After having believed this dogmatic approach for years I decided that it was, once and for all, about time I actually experiment with this myself. What triggered this was my curiosity with the DXT tweeter from SEAS.

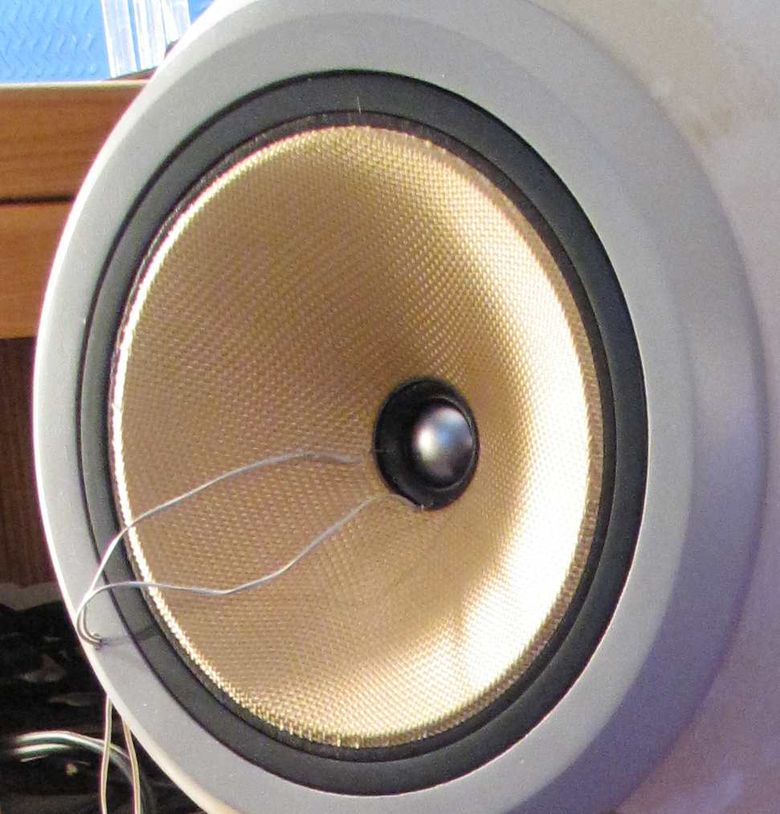
19mm and 25mm tweeters had been available for as long as I can remember but with the DXT tweeter SEAS introduced a transducer that tended in the direction further down the line, ie what comes after the 25mm dome. Yes it's near off axis frequency response is superior to that of most naked domes, but the waveguide itself controls the far off axis in a way that actually reduces the amount of far axis energy to a lower level than typical domes.
Now at the time I had only experimented with different 25/28mm domes but it occurred to me that with the DXT I had some proper room for experimentation. While a 19mm dome offers a higher amount of high frequency off axis energy than a 25mm dome, the DXT should offer a decent amount less than the 25mm dome. For experimentation purposes I chose to buy a pair of XT19s and XT25s from Vifa and the DXT tweeter from SEAS.
To cut a long story short I vastly preferred the sound of the XT25 to that of the XT19 and simply loved how the DXT sounded. The same improvements that the XT25 brought over the XT19 were simply magnified when going from the XT25 to the DXT.
Describing how something sounds is always a pain in the neck because we all experience sound differently plus our memory over how something sounded is frightfully bad. Still the subjective effect was like starting out with a soundstage or presentation that was awash with confusing high frequency hash. The sound wasn't bright, as per say, but just unpleasant, imaging was diffuse and placement simply sounded confused. Instead of listening being a relaxing experience it was like hardwork. As if you were having to listen through this wash of confusing high frequency energy in an attempt to pickup placement cues.
Swapping to the XT25 was like a breath of fresh air. Image presentation, such as a the strong central image assocaited with solo singers, tightened up considerably and with it so did everything else within the soundstage. Listening was no longer anywhere near as difficult and I could actually relax. It made sense to me why so many reviewers had raved about the XT25 in the first place. Due to its 25mm voice coil the outer ring of its diaphragm actually has a larger diameter than standard 25mm dome tweeters. As a result its off axis response is worse than typical 25mm domes and you can hear this as an improvement in image stability. Moving to the DXT was a similar experience simply improving upon what the XT25 did over the XT19.
The obvious reason for this is that rooms have walls and reflective surfaces and any reflections that occur within a certain time frame compared to the direct sound, simply act to smear and confuse your ears as to where the direct sound actually came from. Stereophonic reproduction works best when using headphones, as the rooms influence is completely removed, but this creates the usual 'within your head' type of presentation which isn't exactly natural. Headphones are great for some things but most people much prefer listening to music on loudspeakers.
The rooms influence is typically required to give a degree of spaciousness to the sound and to make things sound less artificial. This is done via its natural reverberation, which we want to preserve, but at the same time we want to reduce the early reflections, from the side walls and other various objects, that otherwise act to interfer with imaging cues which are arguably the whole reason for stereophonic reproduction in the first place.
You could add room treatment to the side walls, but this typically interfers with the rooms reverberation time, something we want to preserve. This is where the waveguide comes in and why the DXT sounded so nice. The waveguide acts to shape the far off axis response of the tweeter. It effectively reduces the amount of energy present in the far off axis and channels it to the near off axis. This gives the tweeter a very uniform radiation pattern with the frequency response of the near off axis varying very little regardless of angle. But then as you go further off axis the radiated energy drops offs somewhat rapidly, but in a controlled way.
This does two things, the first is that it means the sound presentation remains very consistant within small off axis changes and penalises you less for sitting away from the typical 'sweet spot'. The second is that the reduced amount of far off axis energy means a lower amount of early reflections to smear and disturb the stereophonic reproduction. The neat thing is that the waveguide does this without needing room treatment and without altering the amount of energy presented to the room. In other words you don't need to clutter up your room with room treatment and as a result you don't lose out on any of the benefits that the room provides.
After having used the DXT tweeter the natural progression was to try something bigger. As with most things loudspeaker related bigger is better and with waveguides this also holds true. How low down a waveguide is capable of controlling the off axis response is directly related to its size. Given the available options I decided to try the WG-300 from Monacor, easy to source and easy to use.
I first paired the WG-300 with the Vifa XT25 tweeter as ring radiators had been shown to work extremely well with waveguides and listening to the combination was quite the experience. Whatever the DXT did that I so enjoyed the WG-300 simply improved upon . I was sold, this was what I had been missing, and was quite clearly the direction that I needed to move in.
As stated before, bigger, with waveguides, is always better, but it isn't always feasible. Living in the UK I have quite a small listening room, so a 6-7" waveguide is the perfect size without creating a loudspeaker that is visually imposing.
Up until now I had been auditioning the various tweeters with either an Audax HM130Z0 or a SEAS W15CY001. Neither are perfectly suited for use with a 6-7" waveguide so the hunt was on for a replacement midrange driver. Now when a waveguide starts to control directivity it starts off behaving as an omnidirectional radiator. This is.much the same as any other driver behaves before it starts to beam. But then as frequency rises the waveguide acts to narrow the dispersion before transitioning into a region of controlled, constant, directivity. This being where the off axis response remains relatively unchanged with rising frequency.
If a waveguide is appropriately designed it will start to narrow its dispersion at roughly the same frequency that a cone driver of a similar size does. This is particularly useful. Whereas the cone drivers dispersion will continue to narrow with rising frequency and start beaming like a laser pointer, the waveguide narrows but then transitions into this region of constant directivity. If the wave guide and similarly sized woofer are used together this allows you to cross them over at a frequency where the woofer has actually started to beam, which is usually seen as a bad thing. Then the waveguide takes over, before the woofers dispersion narrows too far, and we're into it's region of controlled directivity.
Crossing the woofer and waveguide over in such a way matches their directivities and allows you to crossover the tweeter higher than you typically would in a standard cone and dome design. With a 6-7" waveguide an optimum point for a directivity match is around 2.5kHz. In contrast if you had simply used a dome tweeter alone you would need to cross no higher than 2kHz, and preferably a little lower, if off axis issues were to be kept to an absolute minimum. Clearly a crossover point of 2.5kHz is a far more attractive proposition for any tweeter, regardless of how well it is built and the waveguide loading helps to lower the demands of the tweeter even more.
The only problem with this is that it requires a 6-7" driver that is exceptionally well behaved up to and beyond 2.5kHz.
This automatically discounts any stiff cone from the equation as the distortion products generated from the cones resonance would create a problem, so soft cones are the only option. Having used the HM130Z0 I was also aware of how beneficial having a high sensitivity midrange driver is, so I was after a high sensitivity soft cone driver with a smooth and extended frequency response.
At the time driver choices were somewhat limited and not only did I want the driver to offer high sensitivity I also wanted it to to improve upon the W15CY001s, already impressive, distortion performance. The 18Sound 6ND430 was an initial contender, but Zaph soon released measurements for an FST driver from B&W that fit my requirements perfectly. I emailed, then phoned up B&W within the next couple of days and bought a pair.
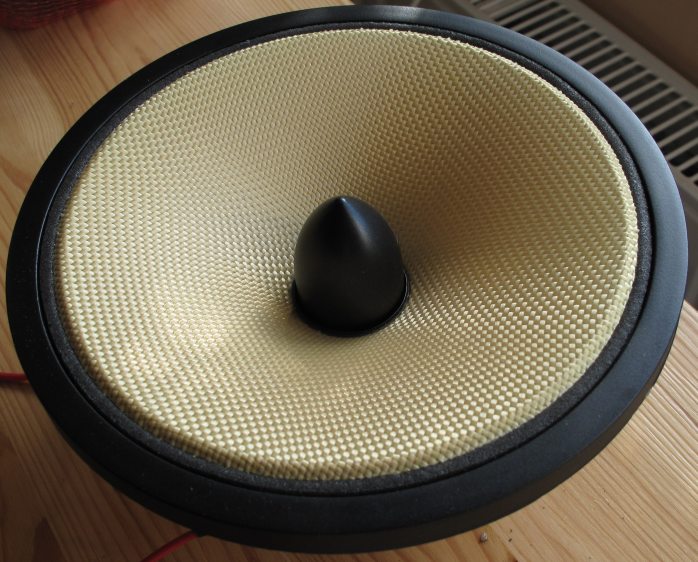

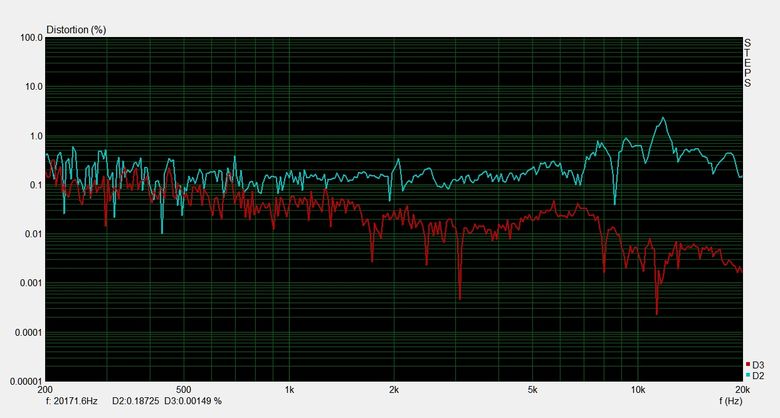
The FST is a remarkable driver. It has an extremely well designed softcone with a very low moving mass. This isn't always easy to achieve as lightening the cone typically leads to resonances that plague the loudspeakers performance. The B&W does exhibit one such issue, at around 3.3kHz, but it is fairly benign and is usefully above my intended xover frequency. Soft cones do typically present with a cone edge/surround resonance, and this can easily be seen in drivers such as the Satori series from SB Acoustics and the Revelators from Scanspeak, but the flat surround of the FST usefully eliminates this. The basket is extremely open and the motor uses a nifty compact neodymium magnet with a very thick top plate and underhung motor.
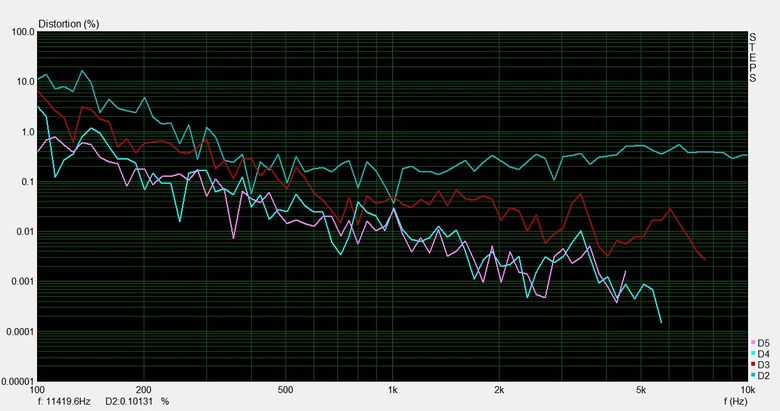
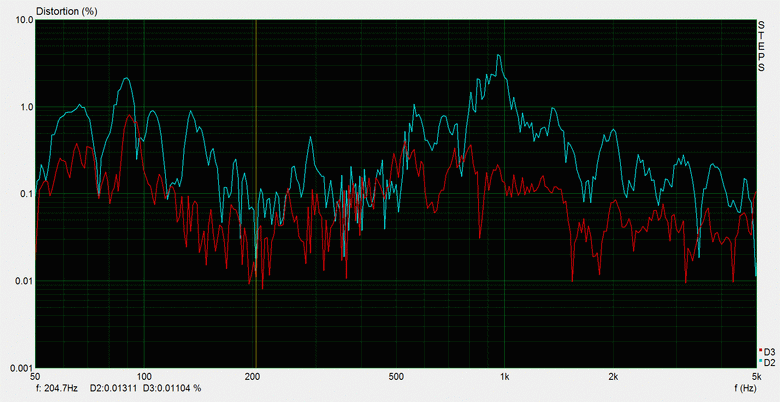
Above is a distortion measurement for the FST, taken at 2.83V RMS. This is loud. The FST is a nominal 4 ohm driver but it is also very sensitive giving out a minimum of ~95dB depending on what frequency you are looking at. Still it presents with exceptionally low distortion. As mentioned before it does have an issue at 3.3kHz and as you can see this results in a peak in the 3rd, 4th and 5th order harmonics at the same frequency. The peaks are actually quite significant and are an order of magnitude higher than the distortion would be without their presence. Usually this would be a huge fly in the ointment but due to the B&Ws ridiculously linear motor they are rendered a non issue. Clearly the FST is a midrange only driver and cannot be used below around 300-400Hz and with steep filters.
My first speaker with the FST used the WG-300 and in combination with the HDS tweeter from Peerless. These worked very well together and relied on the RS225 from Dayton Audio to cover the bass.
My first speaker with the FST used the WG-300 and in combination with the HDS tweeter from Peerless. These worked very well together and relied on the RS225 from Dayton Audio to cover the bass.
These sounded excellent and provided a very useful platform for initially seeing what the FST, and surrounding system, was capable of. Due to the rare nature of the excellent linearity of the FST and the highly capable HDS tweeter both 2nd order and 4th order acoustic crossovers were viable at 2500Hz. As the systems crossover was handled by a DSP this gave a unique opportunity for comparing the audible differences between the two. Correctly programmed the DSP was capable of switching between the two, at the touch of a button on my remote control, literally within less than 0.1 seconds.
Could I hear a difference between the two? Yes, but not because of the filter order. The only difference was with the tonal balance. The 4th order xover coming across as slightly more forward than the 2nd order. This obviously required further investigation because I needed to figure out why. Both crossovers measured pretty much exactly the same with axial, gated measurements but it was the room averaged responses that showed where the differences lay.
With the room averaged responses, the 2nd order filter displayed a slight depression around the crossover frequency when compared to the 4th order. Clearly there is a significant amount of C2C separation, manditory due to the drivers physical size, but this same separation results in rather significant issues in the vertical off axis response with suckouts present, not too far below and above the listening axis. Naturally the steeper the filter the less of an issue this presents with, with the 2nd order filter having wider regions of cancellation in the vertical off axis. This is what I was hearing.
Thankfully these vertical off axis issues are subtle and without being able to quickly swap between one and the other I doubt I'd have been able to hear any difference at all. Both sounded excellent.
The system had an impressively flat frequency response, superb off axis response and ridiculously low distortion at even, what I consider, loud listening levels (as shown above). This distortion measurement was taken at around 85dB, somewhat lower in level than the original test of the FST, but nevertheless relevant because I don't normally listen any louder than this.
One other consideration I had regarding the FST was its capabilities down low. How low could it be crossed? And how steep of a slope did you really need? Initially I had gone with a 4th order acoustic slope at 400Hz and this worked well with the close mounted RS225. I was, however, also interested in mounting the woofer on the floor, to help eliminate floor bounce effects, so how low the FST could comfortably cross was of interest.
First up is a comparison of how the FST responds with 2nd order slopes, at both 400 and 300Hz, and at various drive levels.
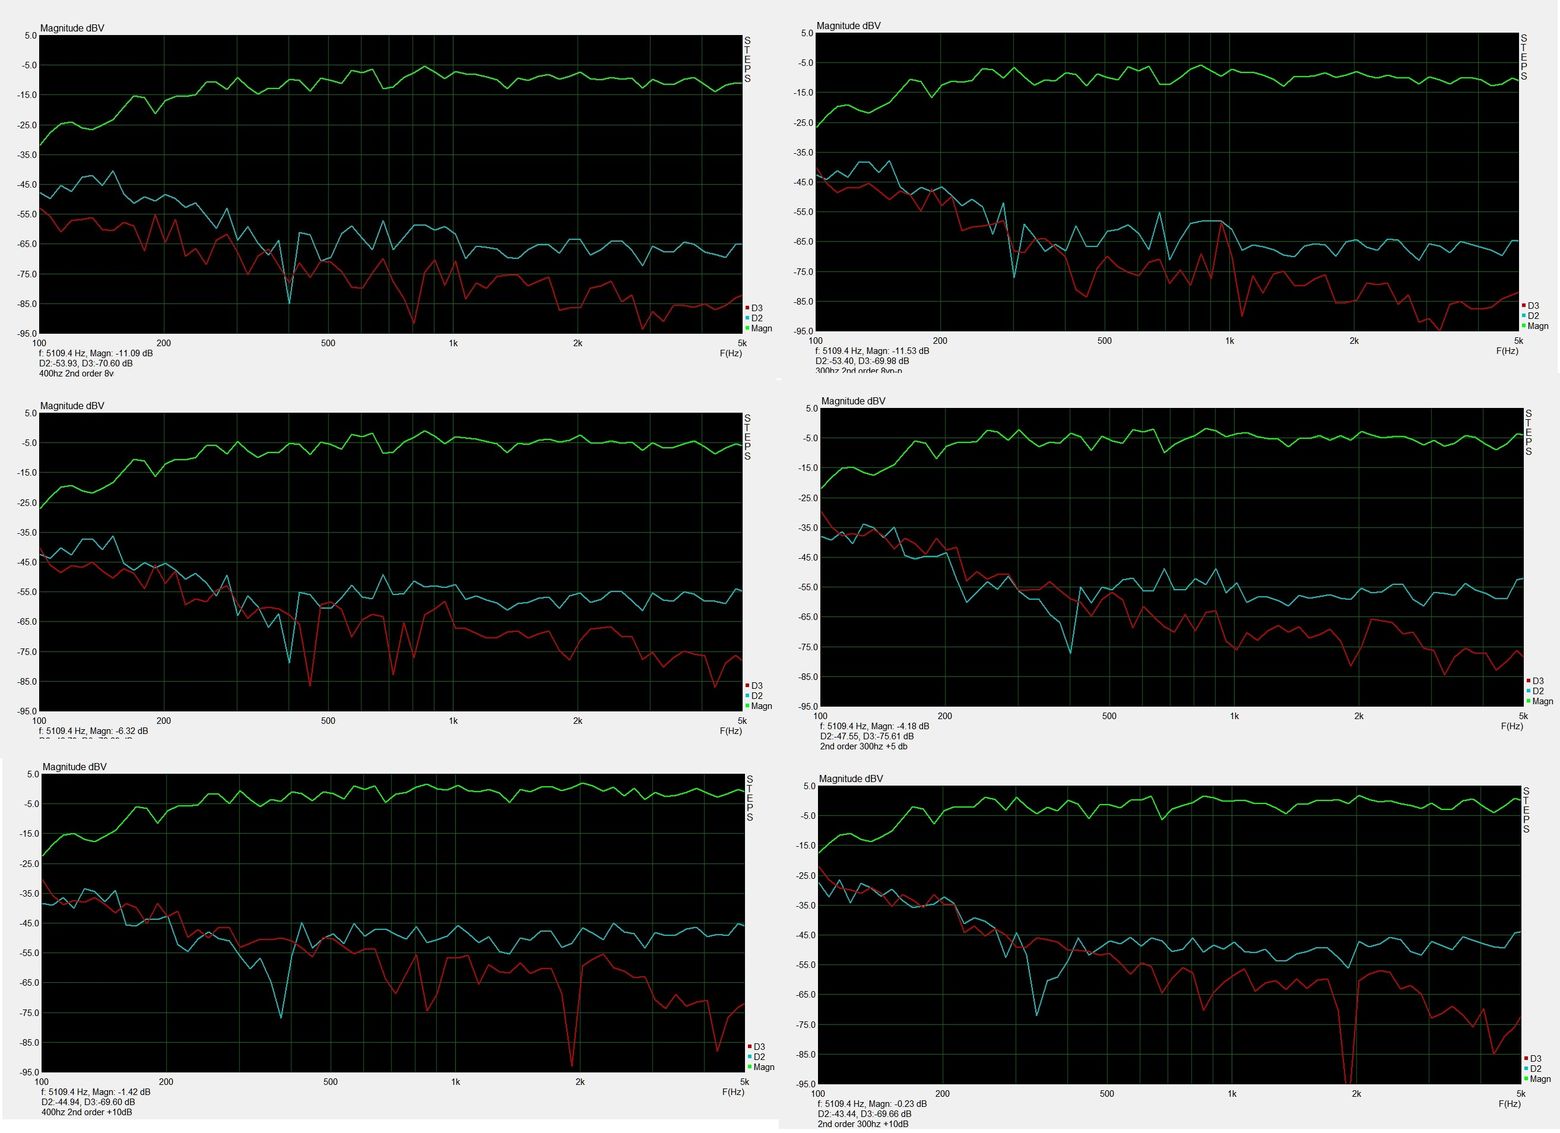
The first graphs show the measured 2nd and 3rd order distortion at a drive level of 2.83V RMS nominal as presented to the FST with then the second set of graphs showing a drive level of +5dB and then the third +10dB. Given the FSTs sensitivity this works out as around 105dB for the final measurement.
Clearly neither 300 or 400Hz work in any acceptabl fasion with the FST and 2nd order slopes. This isn't really a surprise as it has very little xmax and the suspension isn't going to be linear beyond around 1mm of travel.
Clearly neither 300 or 400Hz work in any acceptabl fasion with the FST and 2nd order slopes. This isn't really a surprise as it has very little xmax and the suspension isn't going to be linear beyond around 1mm of travel.
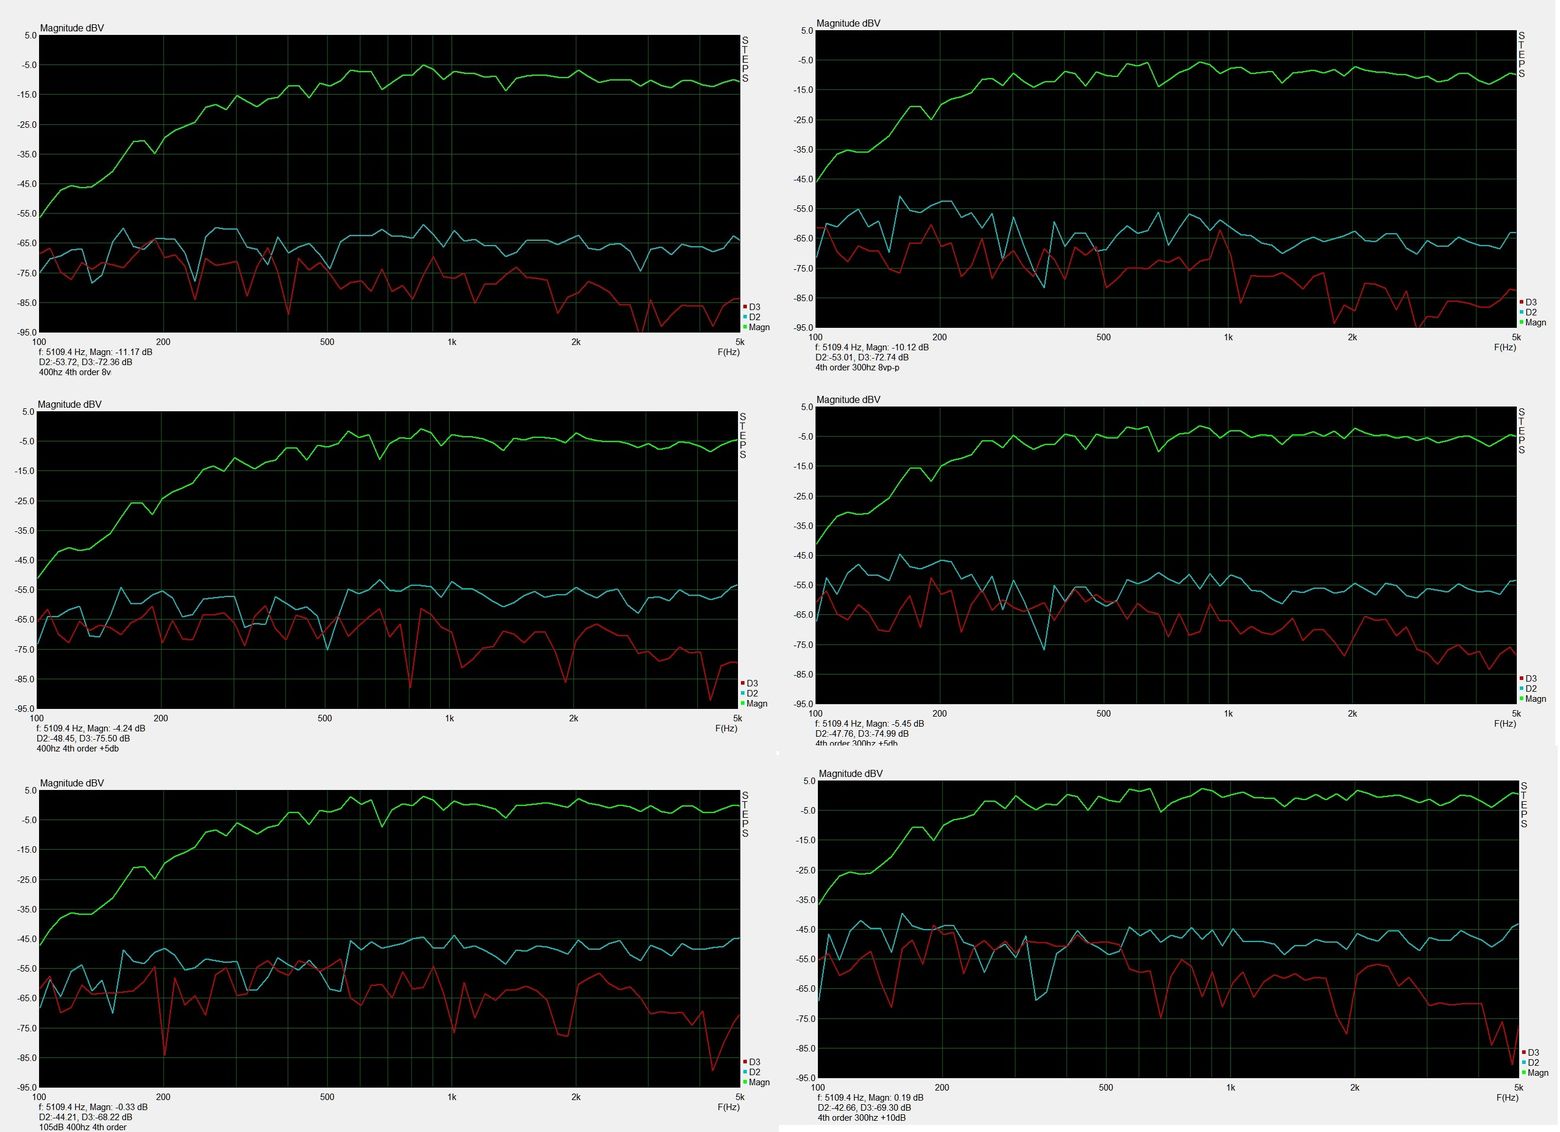
The 4th order measurements are a different story entirely. On the left you can see the 400Hz measurements and on the right the 300Hz measurements. Clearly using the driver down to 300Hz is pushing its capabilities to the limit, distortion is ever so slightly higher on the low end but not to a degree that would be worrying and especially as these are rather loud listening levels too. Louder than I actually listen in fact, but these measurements show that the FST is actually capable of a 300Hz xover at the expense of a tiny loss of linearity - good news indeed!
Now having used these loudspeakers for a while I was constantly thinking about ways to improve upon them. There was a small amount of colouration present that I attributed to the box design. I was otherwise extremely happy with the way the system sounded so I started some research into the marlan head unit that B&W had designed specifically for the FST.
After looking at the white papers it became apparent that the internal shape was essentially a sphere with two holes in it at either side. On one side you place the driver and on the other side you place a cone. Not the easiest of shapes to construct out of any of the usual construction materials and methods I was used to, so this required some thought.
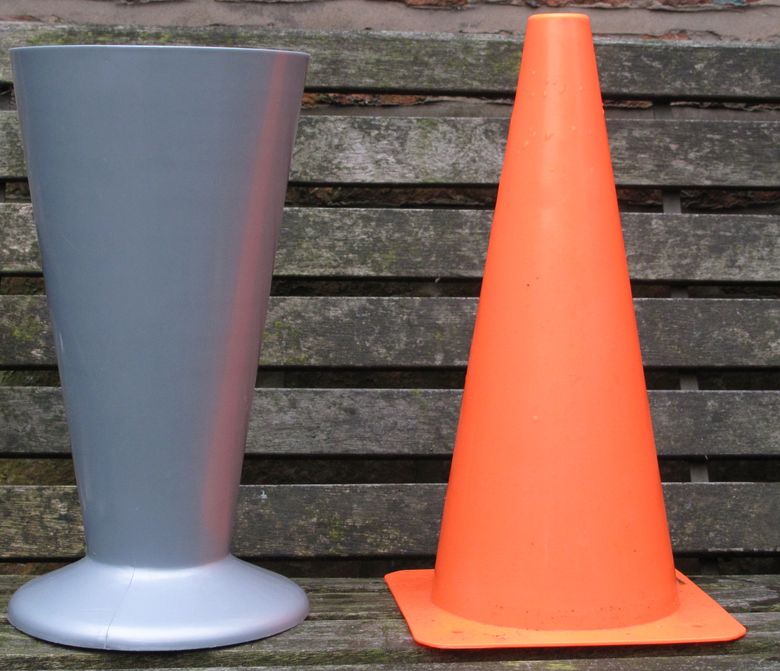
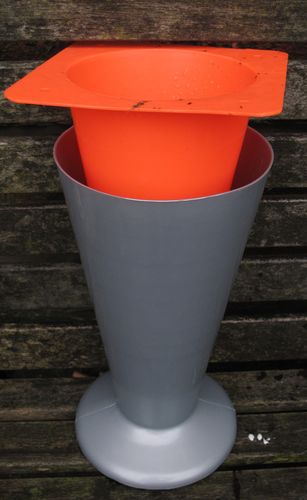
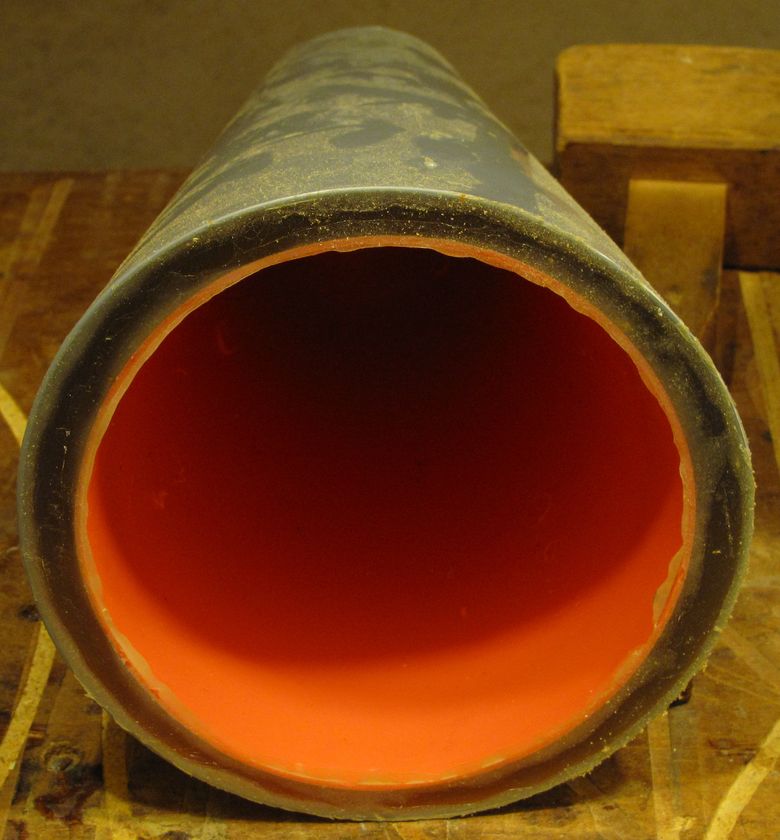
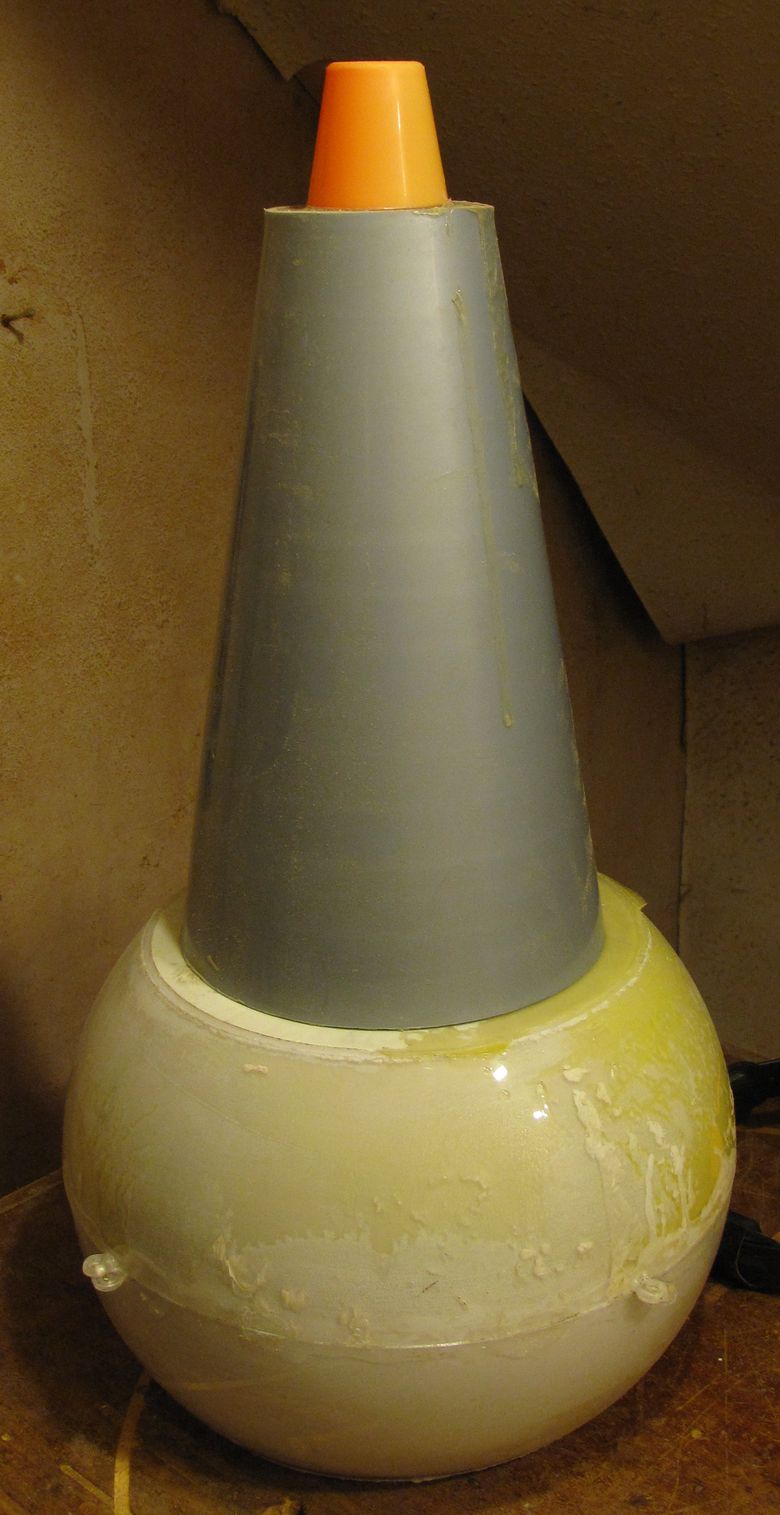
Spheres and cones. So off I went searching for plastic spheres and plastic cones. Traffic cones, vases, hamster balls and display balls to be exact. I figured if I could find objects of suitable dimensions online I could use them as a casing into which I could pour polyester resin filled with something suitable.
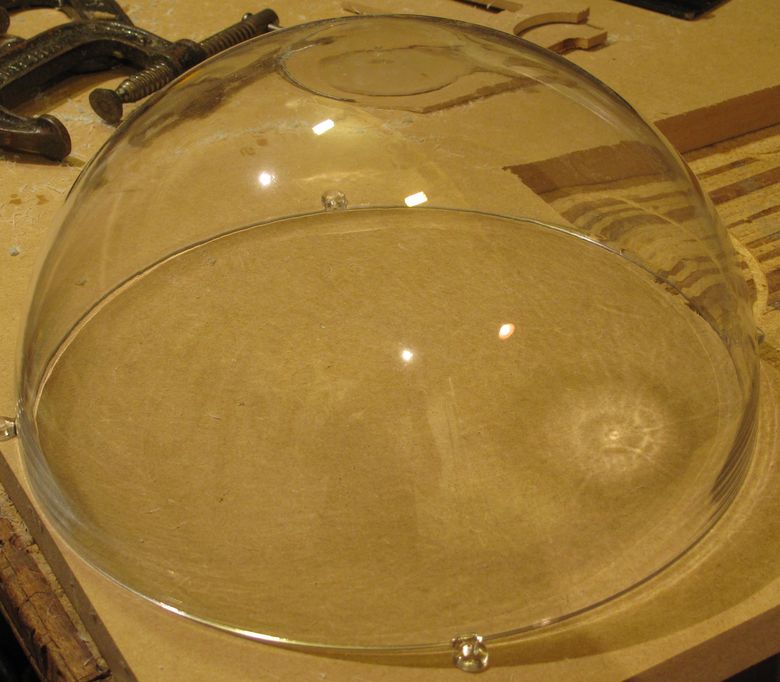
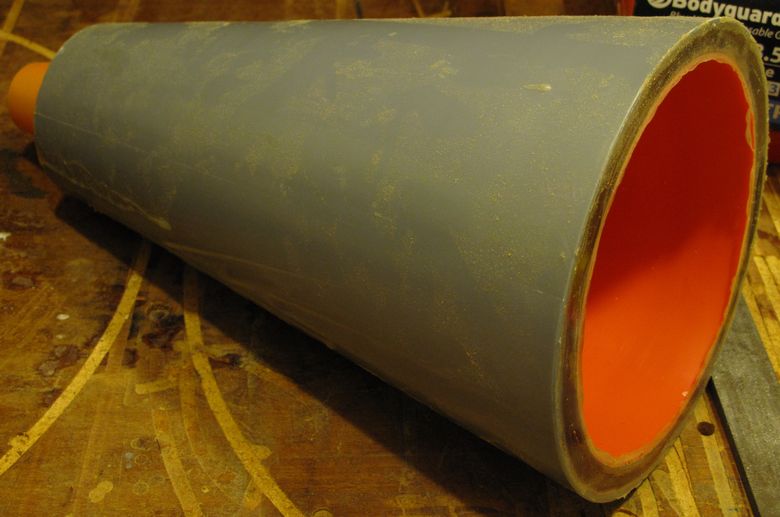
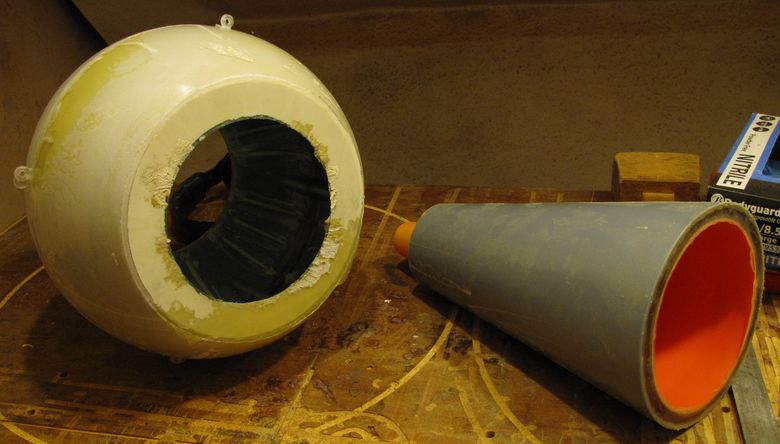
One vendor had some nice clear acrylic balls for sale that split down the middle so that they could be filled. These were a nice find as they were 30cm in diameter which was the exact size required and offered a nice level of surface finish. As to the inner sphere, the only thing I could find was a hamster ball. This wasn't pefect as it contained breathing holes, useful for the hamster, not so useful for me. These would need to be filled, but they were otherwise decent. A sports shop on ebay provided compact traffic cones, most likely used to mark out goal posts for street football, that would work very well as an internal cone and a flower shop some larger vases that would make for a very nice external cone.
Below shows one half of a 30cm sphere and the two cones side by side. Unfortunately I do not have a picture of an unmodified hamster ball.
Now having used these loudspeakers for a while I was constantly thinking about ways to improve upon them. There was a small amount of colouration present that I attributed to the box design. I was otherwise extremely happy with the way the system sounded so I started some research into the marlan head unit that B&W had designed specifically for the FST.
After looking at the white papers it became apparent that the internal shape was essentially a sphere with two holes in it at either side. On one side you place the driver and on the other side you place a cone. Not the easiest of shapes to construct out of any of the usual construction materials and methods I was used to, so this required some thought.
Spheres and cones. So off I went searching for plastic spheres and plastic cones. Traffic cones, vases, hamster balls and display balls to be exact. I figured if I could find objects of suitable dimensions online I could use them as a casing into which I could pour polyester resin filled with something suitable.
One vendor had some nice clear acrylic balls for sale that split down the middle so that they could be filled. These were a nice find as they were 30cm in diameter which was the exact size required and offered a nice level of surface finish. As to the inner sphere, the only thing I could find was a hamster ball. This wasn't pefect as it contained breathing holes, useful for the hamster, not so useful for me. These would need to be filled, but they were otherwise decent. A sports shop on ebay provided compact traffic cones, most likely used to mark out goal posts for street football, that would work very well as an internal cone and a flower shop some larger vases that would make for a very nice external cone.
Below shows one half of a 30cm sphere and the two cones side by side. Unfortunately I do not have a picture of an unmodified hamster ball.
The first thing necessary was filling the air holes in the hamster balls and then cutting the various ends off of the hemispheres in the correct places. This was easier said than done and required quite a bit of thought as to how it could be accomplished. Using a router would be ideal but supporting the thing wouldn't be easy so I came up with a jig to help solve that problem.
The answer was to do the following.
The answer was to do the following.
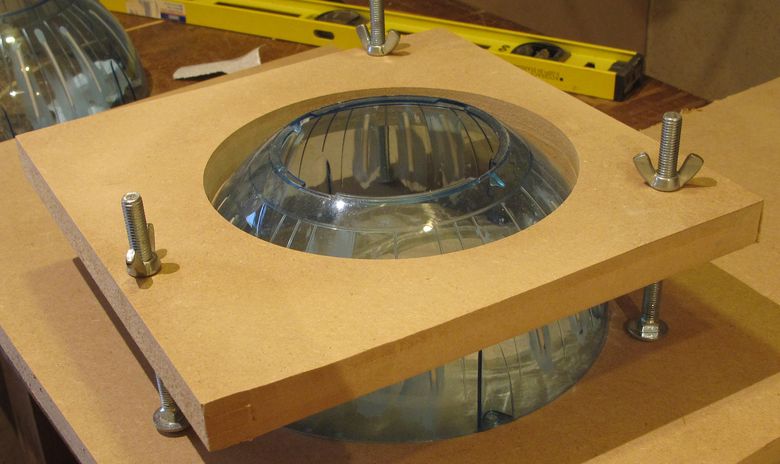
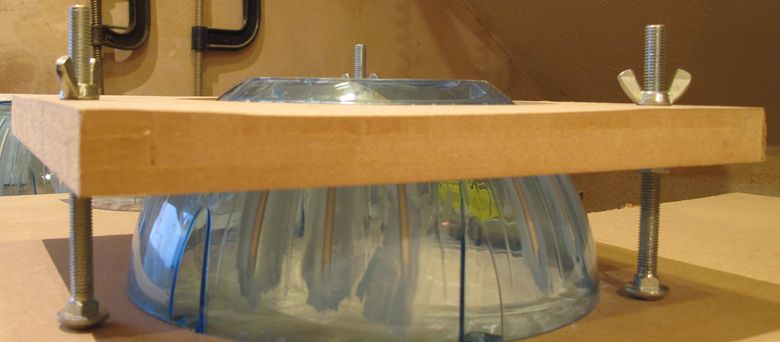
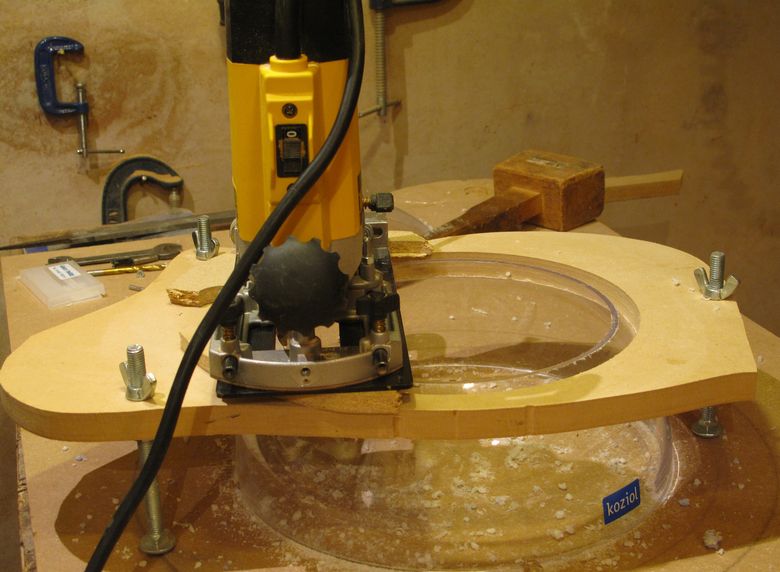
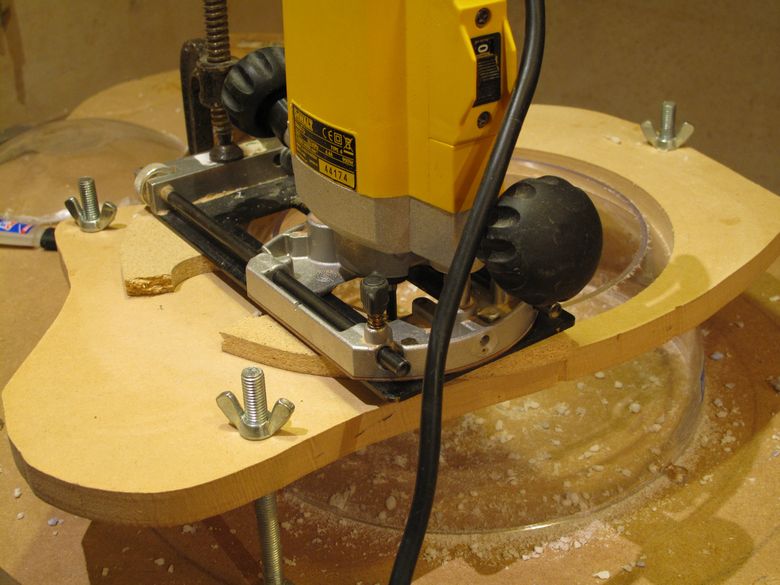
The router ended up clamped in place atop the jig and the three round headed bolts allowed the entire contraption to be rotated around the sphere beneath. This let the router effortlessly glide around and remove the uncessary material.
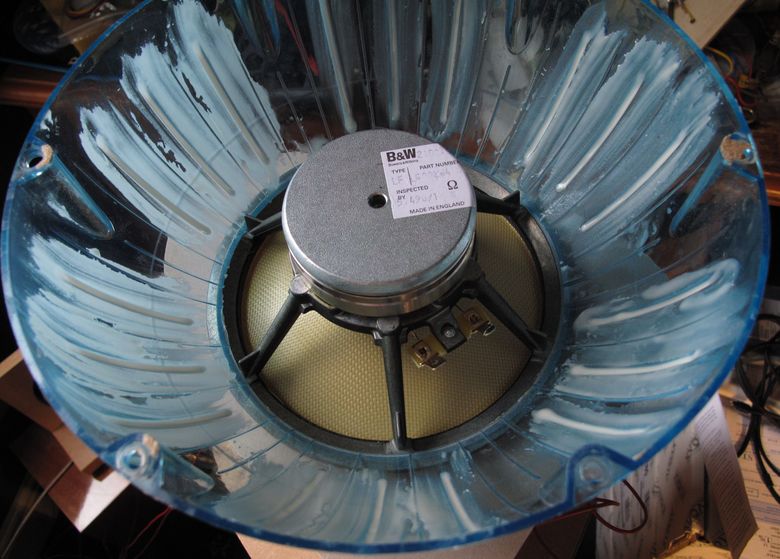
A trimmed hamster ball with the FST.
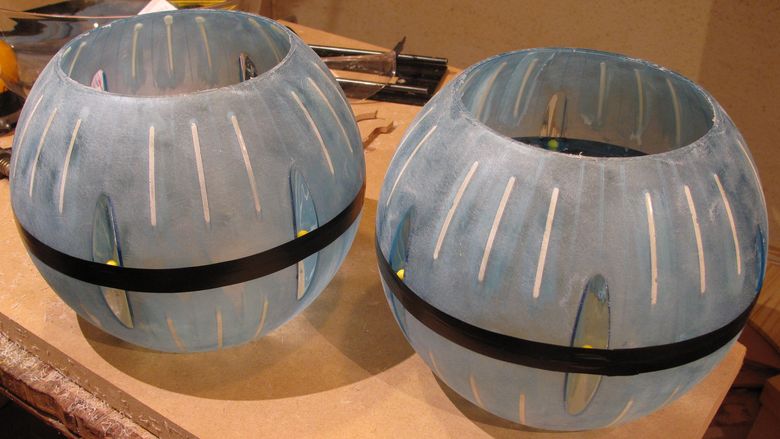
Both hamster balls trimmed, filled and assembled ready for pouring. The outer surface has been roughly sanded to provide a superior surface for which the filler can stick to.
The clear plastic spheres were given the same treatment but left as seperate halves ready for pouring. Of course pouring isn't necessarily the easiest of things to do and that also required a bit of thought. Both the inner spheres and an outer hemisphere would need to be positioned and held firmly in place, but also required a reasonably water tight seal around them so that no liquid would escape. To achieve this I mounted them on a piece of aluminium plate I had lying around that was for another project.
The clear plastic spheres were given the same treatment but left as seperate halves ready for pouring. Of course pouring isn't necessarily the easiest of things to do and that also required a bit of thought. Both the inner spheres and an outer hemisphere would need to be positioned and held firmly in place, but also required a reasonably water tight seal around them so that no liquid would escape. To achieve this I mounted them on a piece of aluminium plate I had lying around that was for another project.
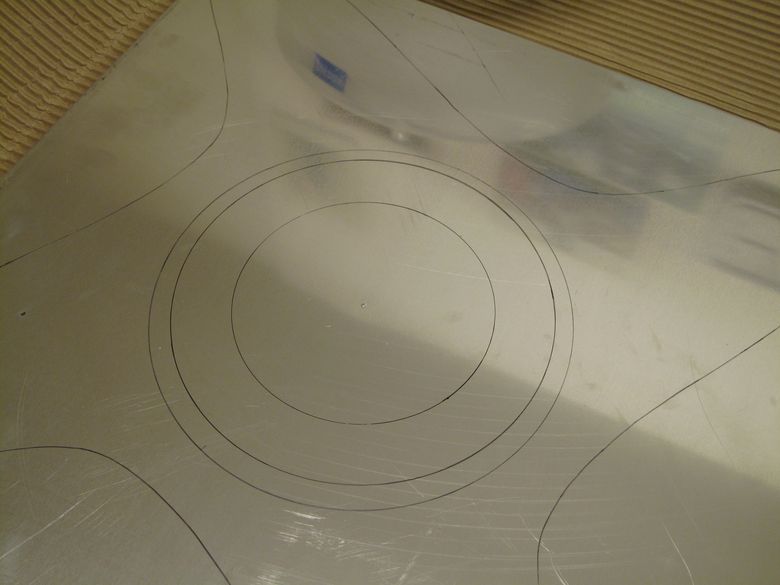
Circles were drawn onto the aluminium plate to assist in aligning the spheres. They were then positioned.
Then they were held and sealed in place using plasticine.
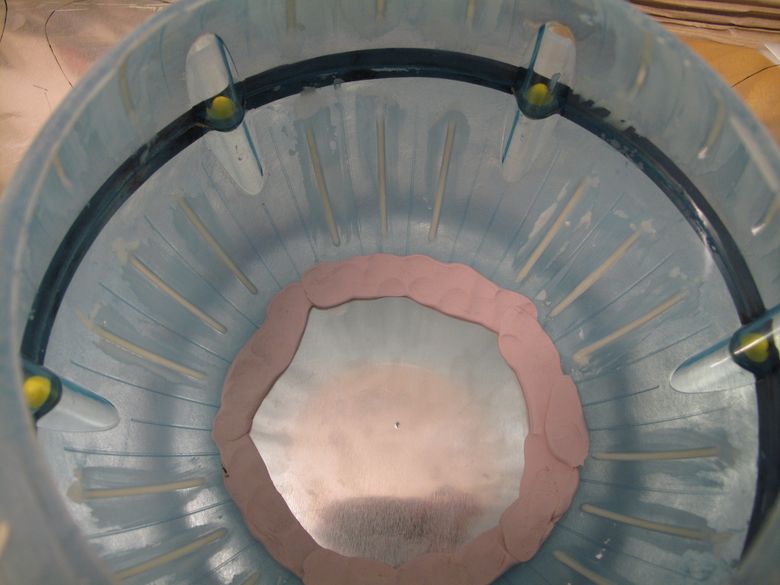

Ready for pouring :)
For this stage I used a polyester resin and filled it with marble dust. I figured that this would be inert and incredibly dense. I was not wrong but caution is advised. Fine marble particles are not particularly good for your health so suitable face masks must be used. The same has to be said for the polyester resin only with more force. Polyester resin fumes will kill you if inhaled. They gather in your liver, screw up its function and put you 6 feet under without so much as a warning. You absolutely have to use a ventilator designed to block organic compounds. Luckly 3M make some decent respirators specifically for this purpose that do not cost a fortune.
For the first pour only a small amount of resin was used, specifically to seal in the spheres without applying too much pressure. Polyester resin is also exothermic in its curing and care needs to be taken with the rate of curing and amount of resin poured at once. As heat increases the rate of reaction you can set off a chain reaction where the resin overheats and spontaenously combusts. So use with caution.
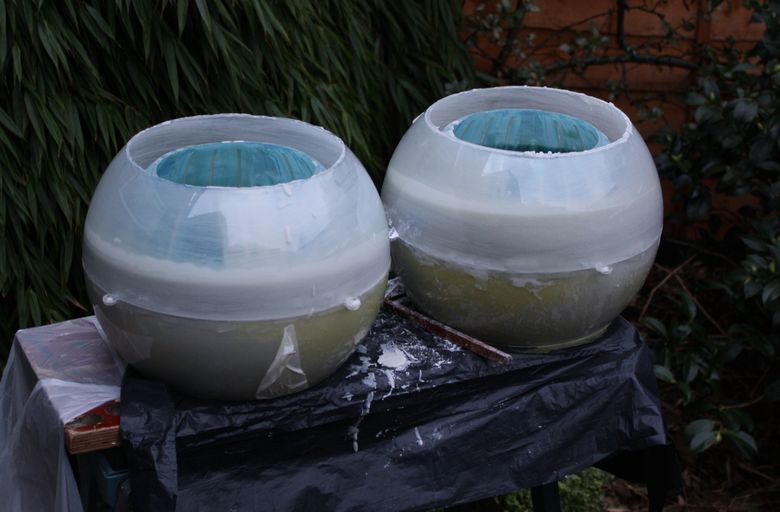
After the first pour the spheres were removed from the unwieldy piece of aluminium. All pouring and mixing of the polyester was carried out in the great ourdoors to minimise exposure to the funes, but also with the 3M respirators.
Two finished spheres. As you can see above a more yellowy and clear resin has been used. This is because polyester resin shrinks during the curing process. This left some fairly big voids and they needed filling. To solve this issue some epoxy was used. Epoxy shrinks a great deal less than polyster so why not use epoxy for everything? The reason is cost. I needed ~20 litres of resin to complete the process and that would have been very expensive to do in epoxy.
The cones were given the same treatment.
The cones were given the same treatment.
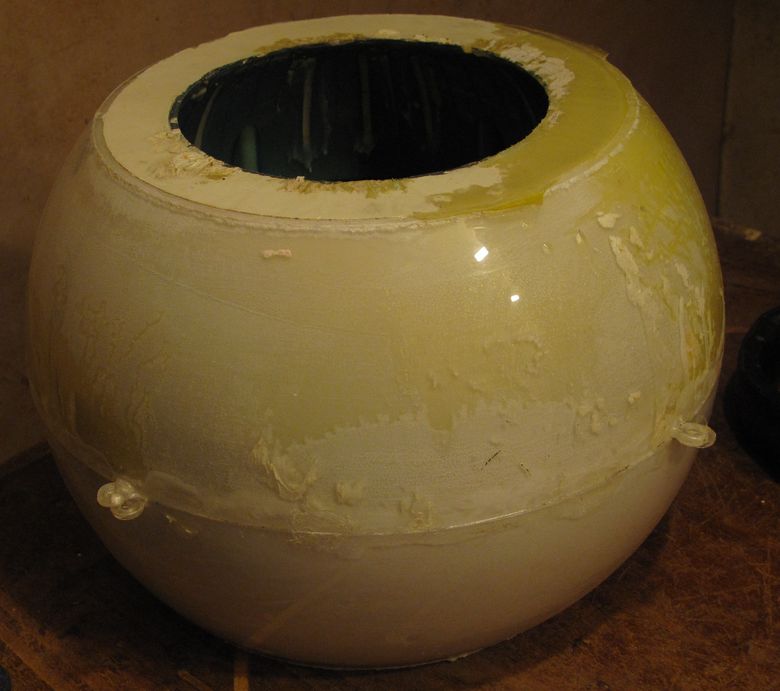
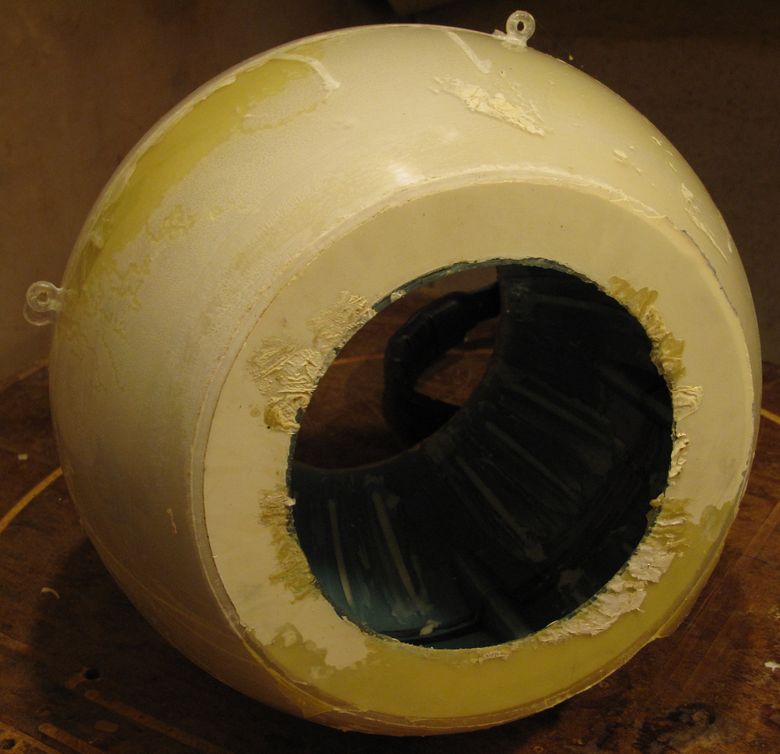
Getting there :) Sanding and trimming required, but then finally, after all the hard work...
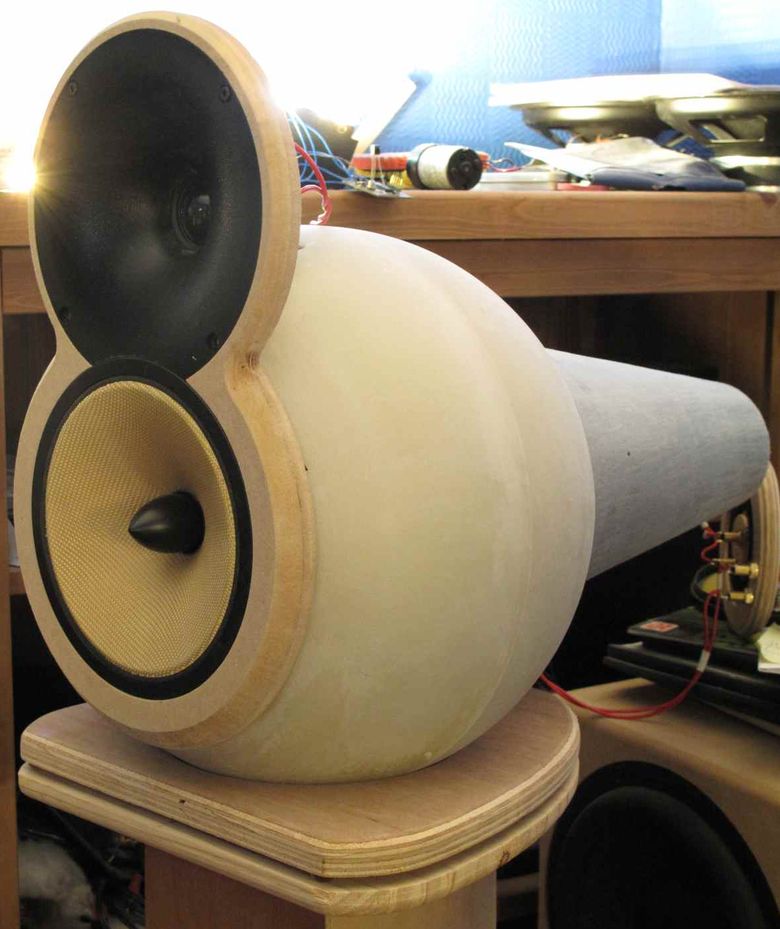
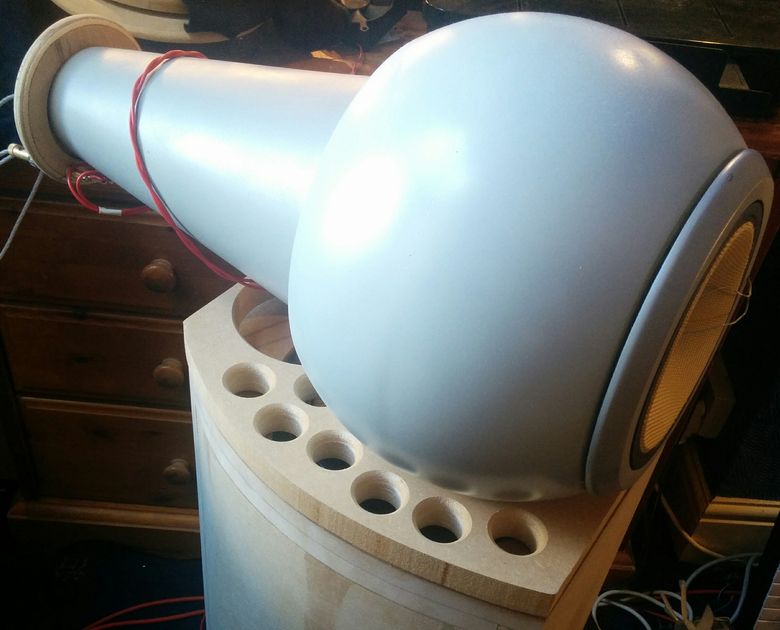
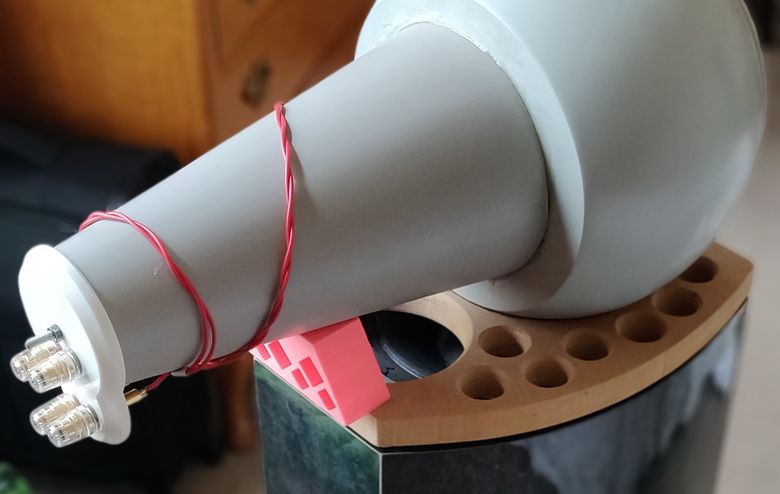
Although the FST is bolted in place from behind via an M6 rod I wasn't comfortable having that single M6 rod support the entire weight of the tweeter and baffle so I inlayed 6 neo magnets into the cabinet to hold the baffle in place. This worked incredibly well!
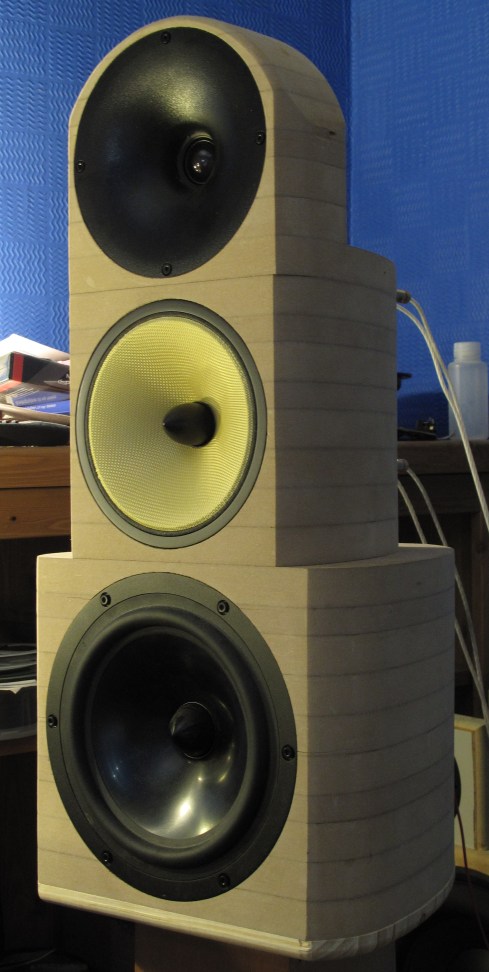
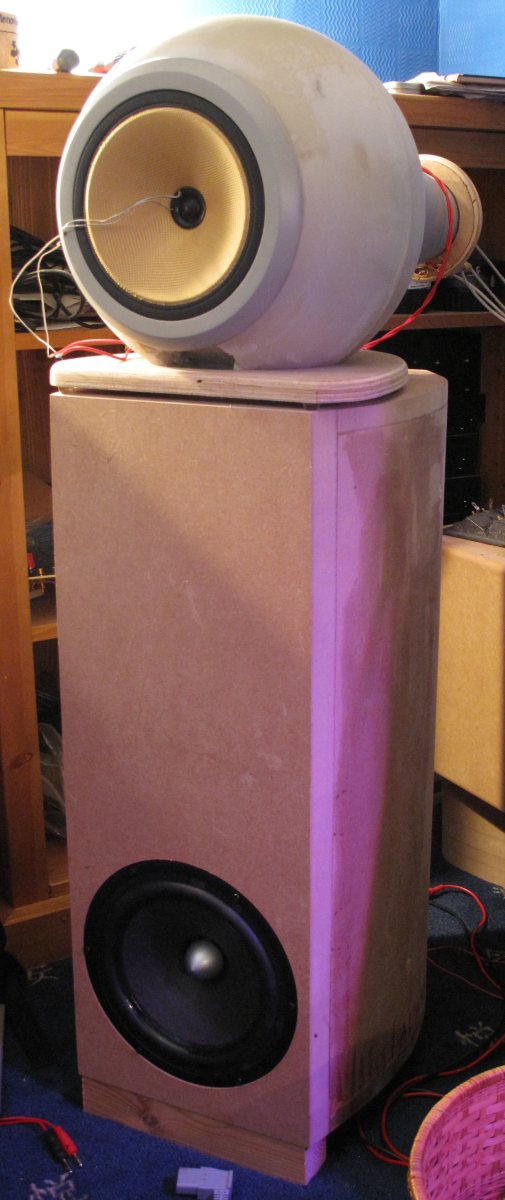
The new cabinet, along with xover modifications, sounded exceptional with all of the previous cabinet colourations abolished and after all of that work I am glad that they were. As can be seen the new baffle mounts the two drivers closer to one another and cuts away into the waveguide. Certainly this is a one way endeavour but brings the drivers centres closer together and therefore improves the vertical off axis performance.
As can be seen the RS225 cabinet has been placed on the floor and a speaker stand has been introduced under the FST enclosure as a support. The floor mounting of the cabinet not only helps to eliminate floor bounce but as the floor acts as a large baffle area, it effectly eliminates baffle step from the woofers response. This results in an increase in overall sensitivity, which is never a bad thing. The only disadvantage to this configuration is the rather large centre to centre distance between the woofer and midrange.
Now this is where you would figure that any sane person would stop, sit back and listen to the music. For a while this was indeed the case but my mind got to thinking and I figured that the FST should make for a fairly decent coaxial driver. It had a smooth profile cone, with decent depth and a very uninterrupted transition from the cone edge to the surround to the basket. The phase plug is easy enough to unscrew and the pole piece beneath is flat with a copper cap, making for a nice ledge onto which a tweeter could be supported.
I suppose this begs the question, why go coax at all? First and foremost my reason for this was because I use the speakers with two listening positions. One is my main listening position, some distance away from the loudspeakers, but my other one is much more nearfield. At this location the driver separation, and somewhat high xover frequency, does create vertical integration issues. Placing the tweeter into the voice coil of the FST loads the tweeter in much the same way that waveguide would so going coax means I get to keep the benefits of the waveguide whilst gaining excellent vertical off axis performance.
For good tweeter performance smooth is the key without any major obstacles or profile changes. This goes for the tweeter to cone/voice coil transition as well as the shape of the surround and the cone. Usually a wide roll surround is necessary for large excursions in woofers, but with midrange drivers this isn't necessary.
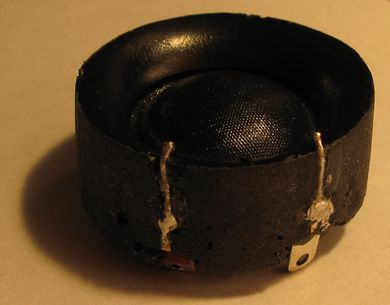
The FST uses a 30mm diameter voice coil with it's inner diameter being slightly smaller. There aren't many tweeters on the market that could fit and certainly very few that could in an unmodified state. The Dayton ND16FA-6 is one such tweeter. It's cheap, with decent performance, and although probably not the best bet for a 2.5kHz xover I figured it would serve as an excellent choice for proof of concept.
In it's natural form the ND16 wouldn't fit so off to the workshop I went and milled down the flange.
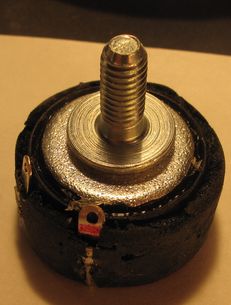
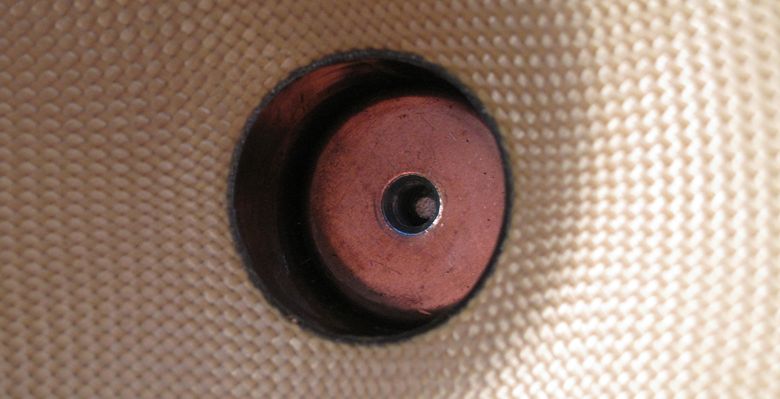
With the tweeter milled down small contacts were embedded into the plastic chassis to give easy access to the tweeter electrically. The phase plug conveniently screwed into place using an M6 bolt with gave a nice way to install the tweeter.

Above shows the tweeter fitted snuggly onto the FSTs pole piece. A pretty decent fit but how would it measure?
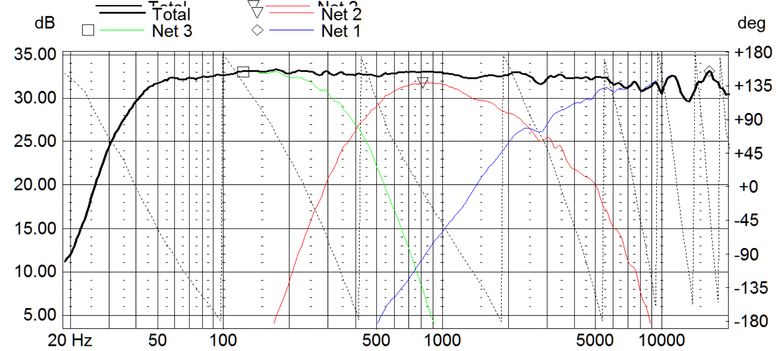
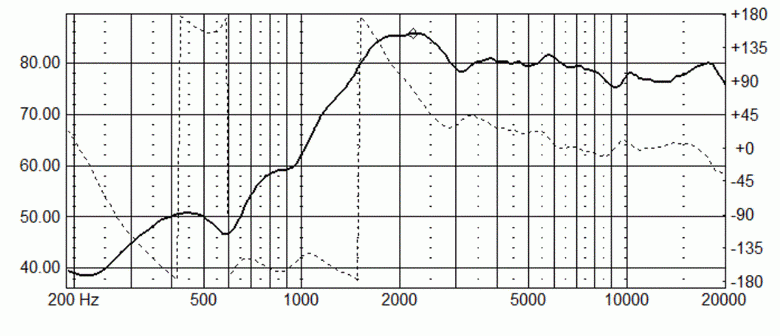
Previously I had measured the directivity of the FST which is as follows.
Previously I had measured the directivity of the FST which is as follows.
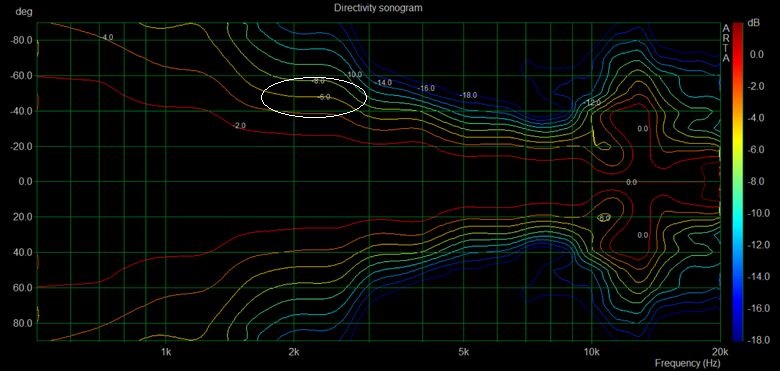
The above diagram isn't perfectly clear but the important part to pay attention to is the high-lighted region around 2-2.5kHz. This specifically shows the region we are interested in. At this point the FSTs directivity has narrowed so that its response is -6dB down out at around 45 degrees. This is where we want to cross over.
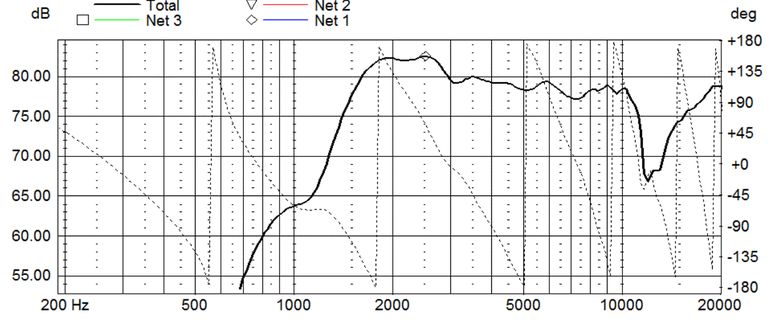
Here we have the tweeters frequency response. As can be seen it has issues in the top octave. This is not unusual with coaxial drivers and isn't something to be overly worried about. Usually these problems go away off axis and if they do cause tonal balance issues the response can be tilted up or down until the speaker sounds right.
What's important is that the tweeters frequency response, barring the top octave, is impressively smooth. It also shows the typical rise towards lower frequencies that you would expect from waveguide loading the tweeter. This is obviously what we were hoping for. DSP on hand the crossover is a doddle to implement.
What's important is that the tweeters frequency response, barring the top octave, is impressively smooth. It also shows the typical rise towards lower frequencies that you would expect from waveguide loading the tweeter. This is obviously what we were hoping for. DSP on hand the crossover is a doddle to implement.
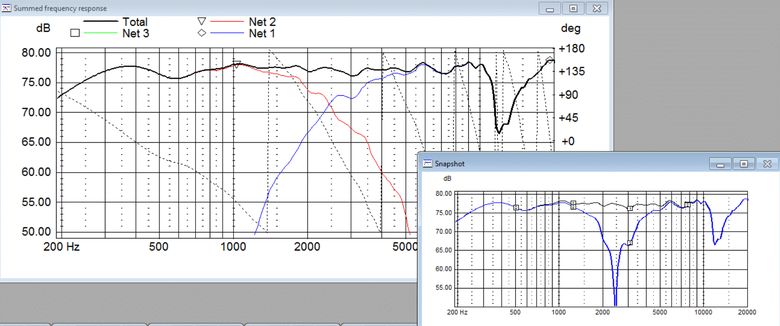
So how did this sound? Well having never experienced what a coaxial driver could do I was most taken aback. These sounded great and especially in the nearfield position, coherency was absolutely wonderful. Some off axis measurements were also done to check that the tweeter and FST were working well together.
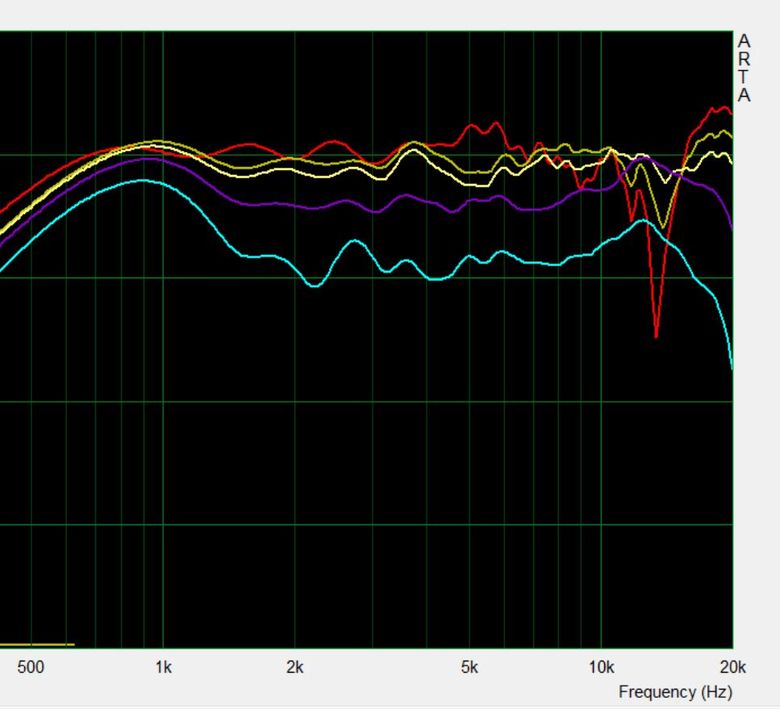
These were somewhat quick and dirty but show what I was hoping for. The top octave hole does indeed fill in off axis, the frequency response is impressively uniform over the near off axis angles, the two drivers integrate very well and the directivity seems well controlled. The ND16 showed impressive linearity, even installed in such a system and operated lower down than you'd like.
Clearly the waveguide loading helped to reduce the strain that the tweeter was seeing. Measurements showed an increase in 2nd order distortion around the xover frequency, but the higher orders were extremely well suppressed. I was quite happy at this point and figured it was about time I replaced the RS225 and its tiny cabinet.
High sensitivity was obviously a key point but so was compactness. I wanted the bass enclosure to act as a support for the FST cabinet, so the height was essentially fixed, and as I didn't want the bass cabinet to be any wider than the spherical enclosure so was the width. I knew I wanted a curved cabinet, for the improved cabinet rigidity and aesthetics, putting a size limitation of around 8" for the driver.
Absolute bass extension was not required as the system used subs, but I wanted them to extend to around 40-50Hz. Low distortion was also a criteria with performance similar, or hopefully better, than the RS225.
Scouring the internet I realised that a 10" would really suit better and one in particular, the TD10X from Acoustic Elegance, the trouble with that is that it was too large. From Zaph's measurements,Troels Graveson's SEAS custom driver, the JA-8008, seemed half decent but I hated the aesthetics. Now this may seem like a trivial point, but hey some drivers look nice and some do not, the JA-8008 did not, but serendipity called and Troels released the updated version of this driver. Roll on the JA-8008 HMQ.
This driver was a completely different beast visually. Gone was the ugly and completely uncessary fat surround as was the dustcap that made the driver look like something from the 70s. Phase plugs have long been known to improve the bass performance of drivers by removing the need for a pole vent so this was right up my street. Not to mention that the phase plug was visually very attractive coming in a satin silver.
I drew up some plans for a cross section for a curved cabinet, calculated how much cabinet volume I'd have and simulated with the driver. With a slight EBS alignment it would provide the following response.
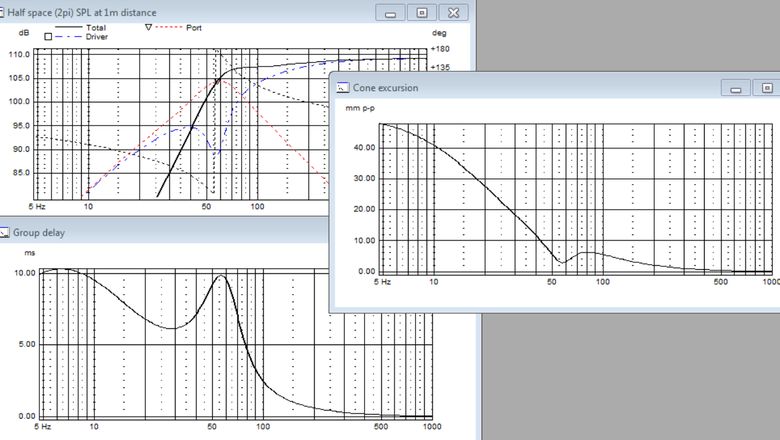
This gave me the kind of extension that I was after and would go surprisingly loud given its limited xmax. Of course it would require some high passing to protect it from over excursion at low frequencies but this is a ported cabinet, so it comes with the territory. So roll on the cabinet construction.
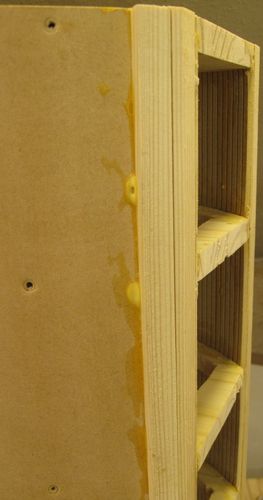
Curved cabinets are a pain. Translams are one way of doing this but they require a ridiculous amount of work and are horribly wasteful of the materials you choose to build them out of. I did not want to go this route so thought I'd give something else a go. The local B&Q sold sheets of this stuff called 'bendy MDF' which is designed specifically for curved applications but it isn't particularly solid or strong. Taking a leaf out of the way the FST enclosures were built I decided to go down a similar route. A twin skinned cabinet with filling.
Curved cabinets are a pain. Translams are one way of doing this but they require a ridiculous amount of work and are horribly wasteful of the materials you choose to build them out of. I did not want to go this route so thought I'd give something else a go. The local B&Q sold sheets of this stuff called 'bendy MDF' which is designed specifically for curved applications but it isn't particularly solid or strong. Taking a leaf out of the way the FST enclosures were built I decided to go down a similar route. A twin skinned cabinet with filling.
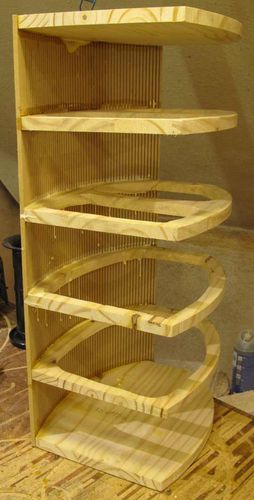
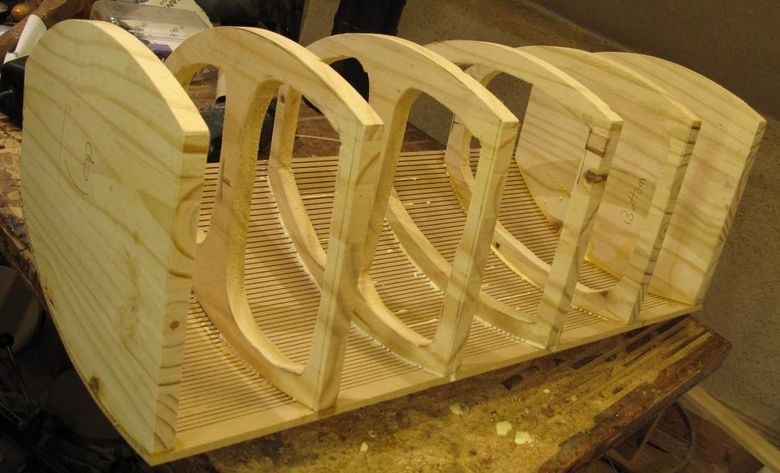
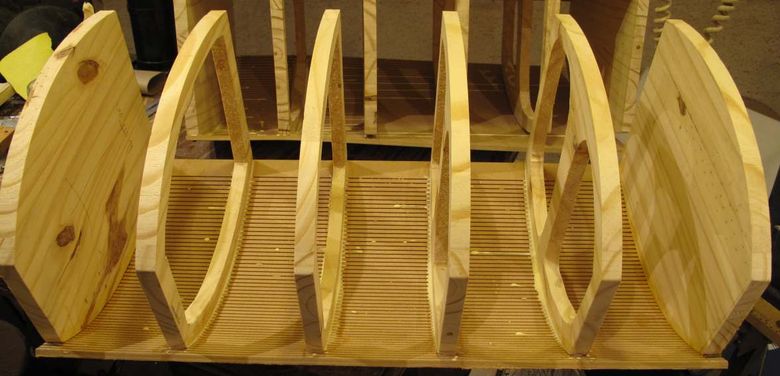
First templates were made out of pine to which the bendy MDF could attach to. I've used a similar construction technique before and knew that really the only way to hold the MDF in place while the glue set was to use screws. MDF was certainly an option for the templates but not a particularly good one, screws do not go well with MDF end grain!
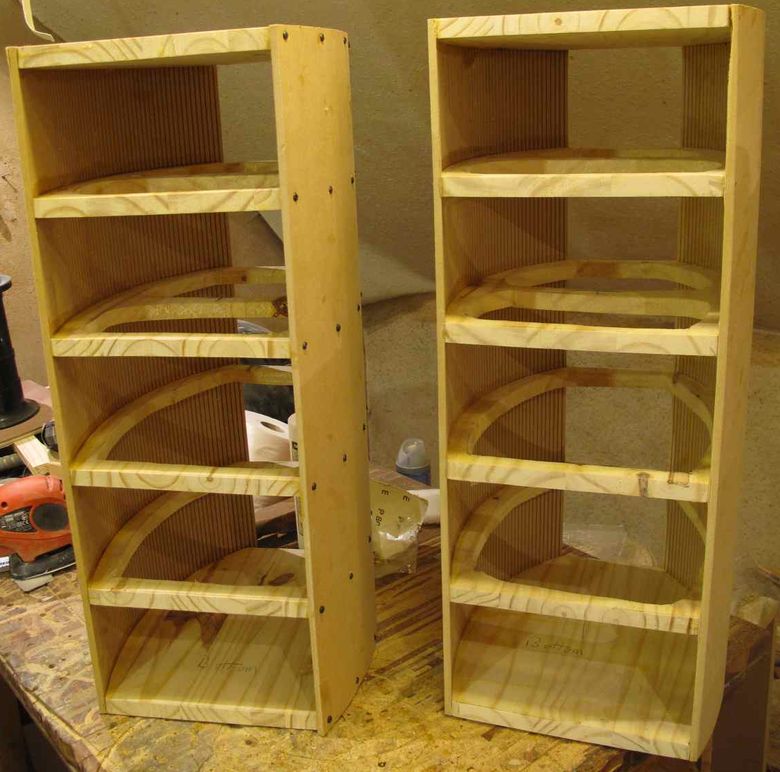
Both cabinets complete with their inner skins attached.
Pine separators were then glued to the inner skin.
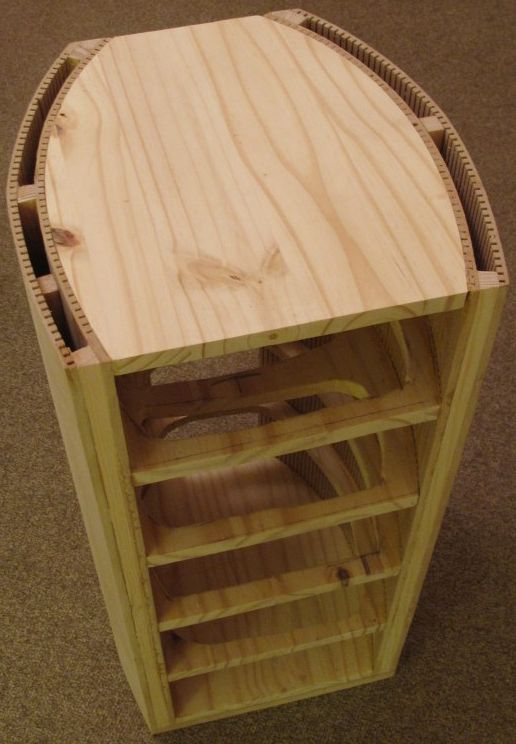
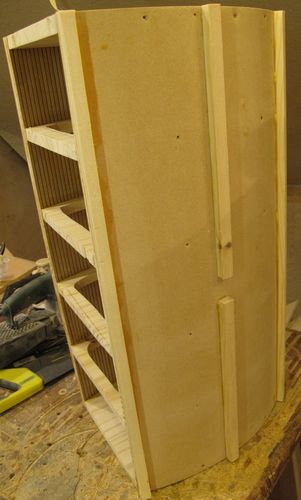
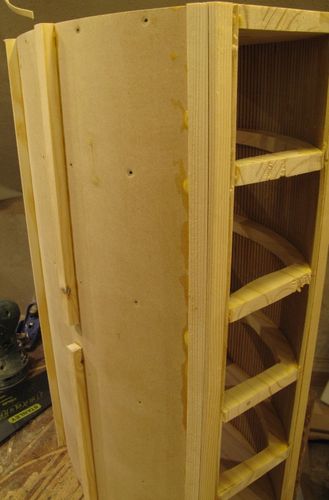
The outer skins were glued on.
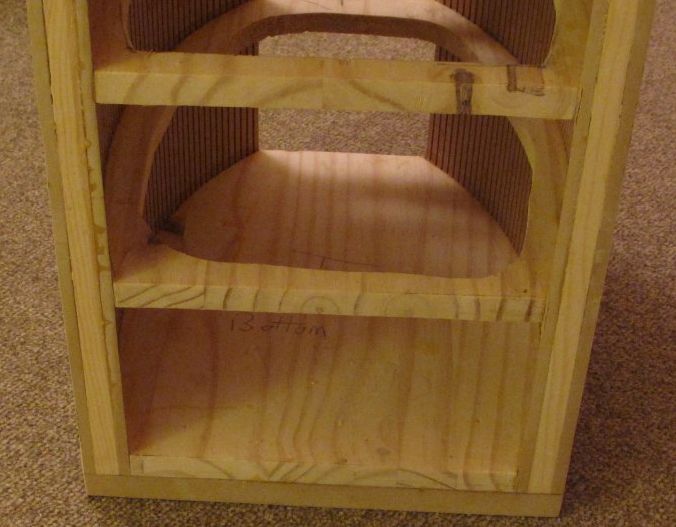
And a bottom was glued to the base of the cabinet, effectively sealing in the pockets created between the two skins, and making the cabinet ready for filling.
For the filling this time I used epoxy and small stones. The small stones added mass to the cabinets as well as being structurally strong and the epoxy binding it all together and providing a degree of damping. After pouring, the top, front and back pannels were added.
For the filling this time I used epoxy and small stones. The small stones added mass to the cabinets as well as being structurally strong and the epoxy binding it all together and providing a degree of damping. After pouring, the top, front and back pannels were added.
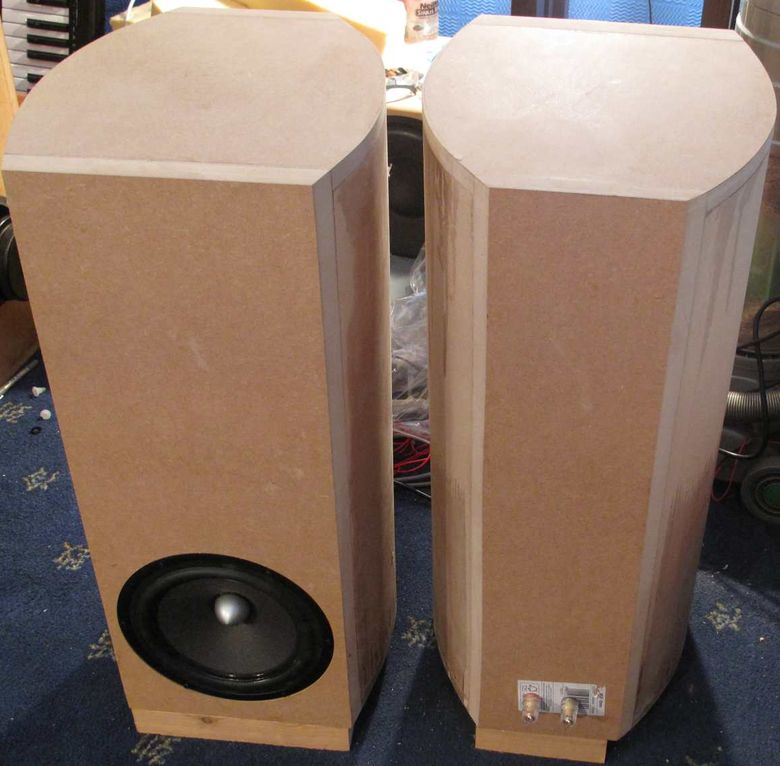
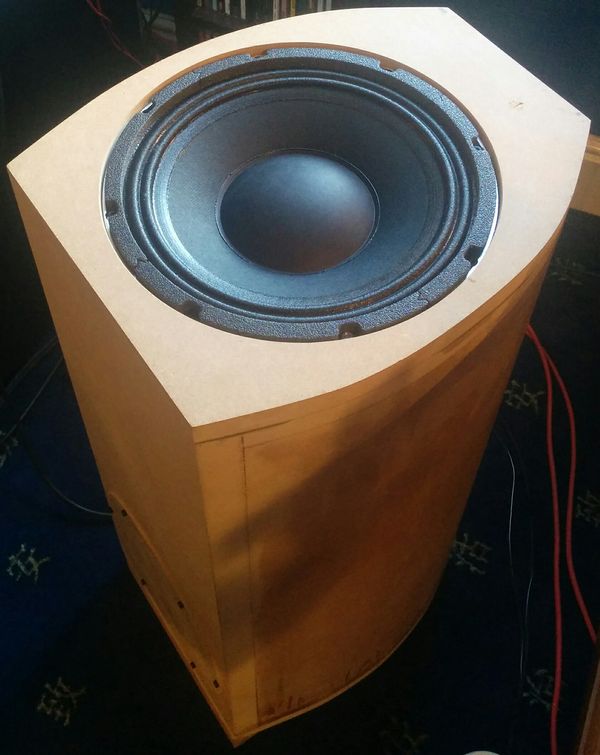
The driver was mounted at the bottom of the cabinets for floor loading and the port was placed within the base of the cabinet with the cabinet lifted a small distance off the ground.
Above being the end result.
One of the reasons I went with the JA8008-HMQ was because of the distortion profile that SEAS drivers typically present with. As frequency rises SEAS drivers normally have a third order product that rises with frequency. Scanspeaks SD motor, for example, behaves quite differently in that its third order products remain flat with frequency. Comparing the two technologues this usually results in Scan drivers having lower upper end third order distortion, whereas the SEAS drivers perform better towards lower frequencies.
As I was only interested in using the driver up to around 300Hz, how it behaved up higher wasn't of much concern.
Above is a distortion plot for the JA8008-HMQ taken at about 90dB. The 4th and 5th order harmonics were omitted for clarity but as you'd expect of, what is essentially, a SEAS Excel driver the higher orders are very low. As one can see the driver hits its distortion minimum at around 200Hz. The third order then rises with increasing frequency as does the 2nd order. In essence though the 2nd order is actually flat but is marred by some resonance issues typically associated with soft coned drivers.
Having the driver at the end of long narrow cabinet and with the port in the base does introduce a degree of quater wave loading to the system and produces what's known as a mass loaded transmission line, or MLTL. From a practical point of view these essentially function as ported cabinets but the quater wave aspect acts to lower the apparent port tuning. As a result the port length of an MLTL often ends up significantly shorter than standard ported box simulations would predict. In my case the ports ended up much shorter than I anticipated and measring the impedance of the system, until the correct tuning frequency was arrrived at, was absolutely necessary.
Back when I was originally searching for coax friendly tweeters the Aura NT1 was high on the list. Aurasound had previously withdrawn from the market but after some searching I managed to come up with a supplier that actually had some old stock. These tweeters were quite a bit chunkier and a whole lot more capable than the ND16s, but there was a high possiblity that they wouldn't fit. Still this wasn't enough to put me off so I ordered two pairs to experiment with.
As with all Aura drivers these come with a nice underhung motor that keeps high order distortion nice and low. Zaph's measurements had previously shown these to be extremely good performers, and certainly the star among all the tiny 19mm neo domes, so I was eager to see what they could do.
As luck would have it, they machined down surprisingly easily and just about fit. The same method of attaching wires to the tweeter was copied from my experiments with the ND16.
As luck would have it, they machined down surprisingly easily and just about fit. The same method of attaching wires to the tweeter was copied from my experiments with the ND16.
The fit is very snug and no mounting screw was actually necessary for fixing the tweeters in place. Due to the depth of the NT1 it ended up being the pefect height to sit directly on top of the FSTs pole piece with magnetic attraction holding it in place.
Surprisingly the NT1 measured better than I thought it would. The top octave issue was gone with the rest of the frequency response very smooth and easy to work with.

To maintain a good directivity match the same xover frequency was chosen with the NT1 offering a very smooth frequency response and requiring less response shaping to get there.
Compared to the ND16, the NT1 version offered a degree of sparkle and smoothness that was missing previously. Now as the system already sounded awesome these improvements were only quite small, but still worth having nontheless.
Compared to the ND16, the NT1 version offered a degree of sparkle and smoothness that was missing previously. Now as the system already sounded awesome these improvements were only quite small, but still worth having nontheless.
And now it's time for an update! - 17/10/2016
Since having built the waves design it became readily apparent that the FSTNT1 was lacking something in the lower midrange. Small two ways typically excel with top to bottom coherency and expecting a largish three way to offer comparable performance, especially in the near field, some would say is a fools errand to begin with.
Three ways are typically designed to function properly at relatively large listening distances. This is usually out of necessity. They usually use relatively large drivers, have relatively large C2C distances and therefore require you sit at a certain distance so that the drivers can sum and integrate properly.
In this case the floor mounted bass driver adds to the issue but in isolation doesn't actually sound that bad. When compared to a small two way however, and in the near field, the cracks begin to show. So what to do?
The lack of near field lower midrange coherency could easily be solved by mounting the bass driver as close to the midrange driver as possible but that would reintroduce floor bounce. Floor bounce typically causes a lack of lower midrange coherency in the far field and the last thing we want to do is fix one problem but create another.
Lying in bed one evening I was pondering this exact problem with the only answer really being to add in another driver. This would put two bass drivers into each cabinet and when going that route I always like to mount the drivers in an opposed fashion so that vibrations cancel out. The only way I could do that is if one driver was mounted on the top of the cabinet and firing upwards, with the counterpart mounted on the bottom of the cabinet and firing downwards. In principle this should work really well.
Having one driver firing upwards, at the midrange sphere, would get one bass driver as close to the midrange as was physically possible and in princple is similar to how some omnidirectional loudspeakers are designed. Then mounting the other bass driver firing downwards would get the other bass driver as close to the floor as possible. This would obviously require significant cabinet modifications, plus the hole for the front mounted JA8008-HMQ would need to be filled, but what drivers should I use?
The JA8008 was originanlly chosen because it's parameters worked well in a ported box of a given volume. If I added another driver the box alignment would change, plus they are expensive. It then occurred to me that because the cabinet is curved, the maximum width that the top and bottom extend out to actually reaches around 30cm...this meant that 10" drivers were actually on the cards. But more specifically 10" pro drivers.
The JA8008 fills a sort of space that sits between standard, low sensitivity, hifi drivers and the high sensitivity stuff that the pro crowd throws at you. When examining the 8" category, going too sensitive creates a driver without much bass and the JA8008 hits a nice sweet spot in the middle, decent, bass extension with higher than average sensitivity. 10" pro drivers typically present with the kind of extension I was after but they wouldn't fit on the front of the cabinet. They would, however, fit on the top.
A while ago audiogurman added in some measurements for the 12" Deltalite II driver from Eminence and I was pleasantly surprised. Eminence had definitely put in some effort when coming up with the motor design as it has low distortion even at high SPLs. The 12" wouldn't fit into my cabinet but conveniently Eminence also make a 10" version. Both appear to share the same motor, giving the 10" similar performance and as these are pro drivers vendors are priced competitively with the rest of the market and come in discounts when bought in packs of four.
Excuse the mobile phone photo, but here we have one 10" Deltalite II driver mounted into the top of the cabinet.
To provide a solid foundation from which to mount the drivers, an additional piece of 18mm MDF was glued to the top and bottom of the cabinets. The Deltalites have a very thick mounting depth, made up of the basket plus a very thick foam gasket that's designed for rear mounting the driver. The mounting depth is around 18mm, so one sheet of MDF is not enough for flush mounting. It is worthwhile getting them flush though because this offers an extra layer of protection for the driver. Once flush no part of the driver extends beyound the cabient so it's protected from accidental knocks.
On the bottom of the cabinet is another driver firing downwards.
As can be seen I made a plug out of a sheet of plywood and some MDF and screwed it into the old hole meant for the JA8008.
Time for another camera photo!
Since the last update I also had the time to paint the midrange cabinet for a much more finished look! The light grey is a nice colour because any dust that collects on the top simply blends in with the paint!
Above can be seen modifications that I made to the support of the sphere to allow the upwards firing driver to 'breathe'. It isn't obvious in this photo but the supporting piece of MDF is separated from the cabinet by small polyurethane feet.
Placing the two Deltalites into this cabinet required a sealed alignment as they would need a much bigger volume to work vented. These are sensitive drivers and as a result don't go all that low without the support of a port. As usual I went with Linkwitz Transform to augment and optimise the bass alignment.
So did going the above route help? You bet! Although it did take a couple of days listening to correctly set the level of the new bass drivers, as well as arriving at a pleasing amount of bafflestep compensation. Using a floor mounted driver typically negates the effects of bafflestep but placing anotheron the top exposes that one to its full effects. I eventually ended up needing to use 2dB of BSC. The top driver alone may have needed up to 5dBs worth of compensation, with the lower driver needing next to none.
At first I tried 3dBs of baffle step compensation but this was too much. Deeper male voices, both on speech and song had too much weight to them. The over emphasis sticks out like a sore thumb and becomes quite annoying in the long run. It would very easy to overcompensate in such a situation because the problem sounds worse than it actually is. Increments of 0.5-1dB need to be tried to arrive at a pleasing balance.
Once adjust correctly though the speakers now sound better than ever. What was once lost has now been found and I couldn't be happier. Granted I think this after each incremental improvement (and I'm sure there will be more of them), but for now this will do.
And time for another update.
After having lived with the Deltalite configuration for a while I decided that I was happy enough with them to actually go ahead and finish the cabinets in something a little better looking than raw MDF. I hate finishing loudspeakers. Some seem to go to painstaking lengths of both time and effort to arrive at something they find satisfactory. Unfortunately I don't have the patience for this, nor really the hefty amounts of energy required to go this route. Still, I do appreciate a finish that looks nice. Highly reflective, piano gloss finishes, polished stone etc, always look amazing but are incredibly difficult to pull off. Having seen a number of highly impressive kitchens I figured that you could probably get formica in any number of finishes and I wasn't wrong! Formica comes with the benefits of being inexpensive, tough and easy to get your hands on. It also comes fully finished requiring only a surface to stick it to and a suitable adhesive. I decided to go with a gloss finish, 'jade stone' finish. Pictures are below complete with new driver fascias and binding post mountings. These were 3D printed on my 3D printer!
After having lived with the Deltalite configuration for a while I decided that I was happy enough with them to actually go ahead and finish the cabinets in something a little better looking than raw MDF. I hate finishing loudspeakers. Some seem to go to painstaking lengths of both time and effort to arrive at something they find satisfactory. Unfortunately I don't have the patience for this, nor really the hefty amounts of energy required to go this route. Still, I do appreciate a finish that looks nice. Highly reflective, piano gloss finishes, polished stone etc, always look amazing but are incredibly difficult to pull off. Having seen a number of highly impressive kitchens I figured that you could probably get formica in any number of finishes and I wasn't wrong! Formica comes with the benefits of being inexpensive, tough and easy to get your hands on. It also comes fully finished requiring only a surface to stick it to and a suitable adhesive. I decided to go with a gloss finish, 'jade stone' finish. Pictures are below complete with new driver fascias and binding post mountings. These were 3D printed on my 3D printer!
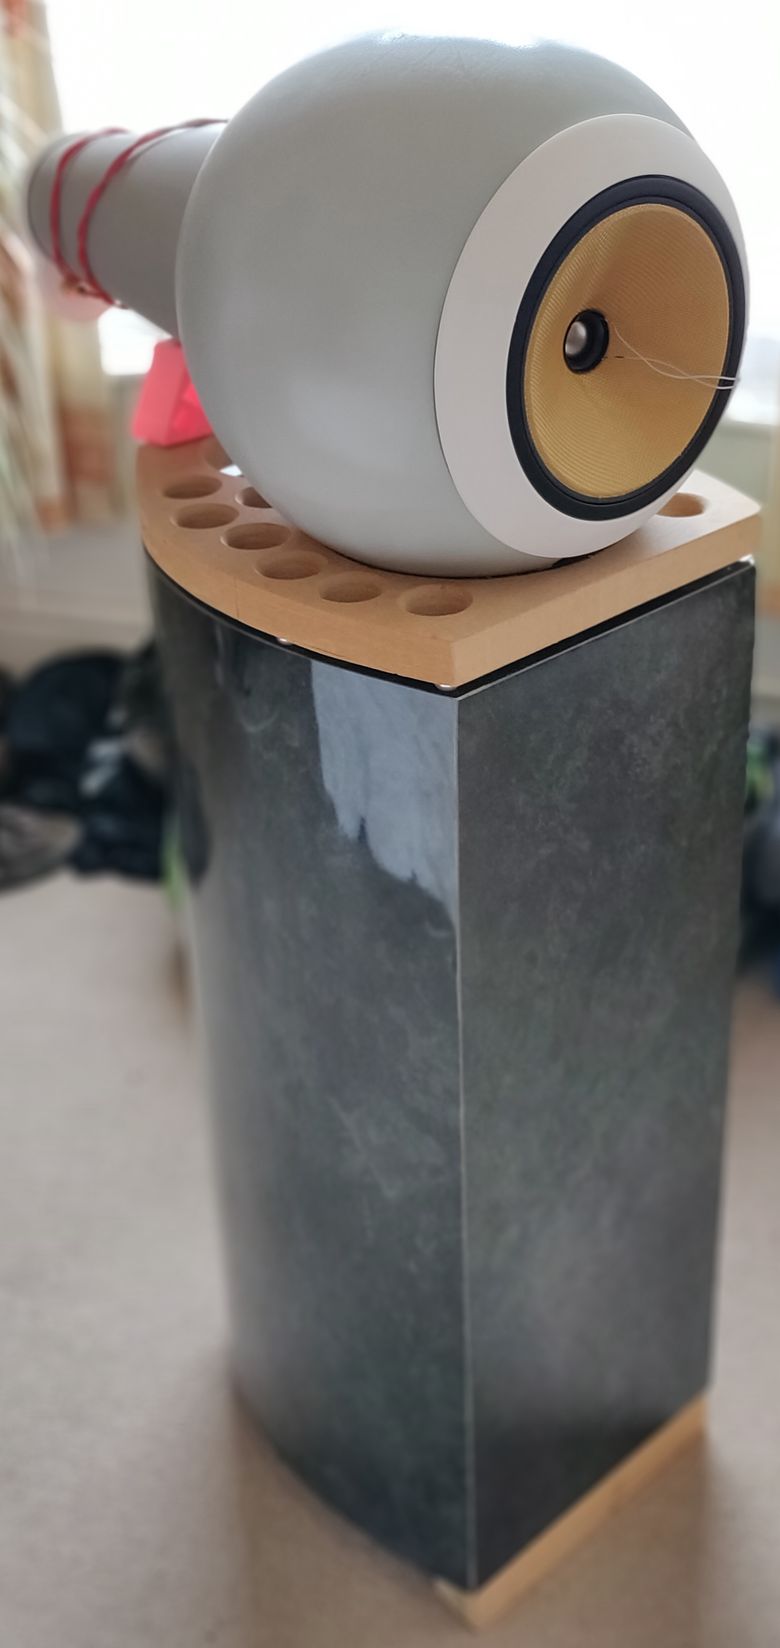
The only thing left would be to 3D print a support for the midrange sphere.